Objectives
To control remotely through the Internet electronic devices such as LEDs, light and temperature sensors, add more microcontrollers with applications. Log readings and produce dynamic graphs.
The electronic setup
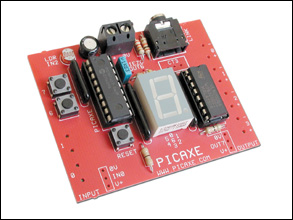
A AXE050 board with Picaxe18M microcontroller is used. Picaxe products are manufactured by Revolution Education. Here is a picture of AXE050:
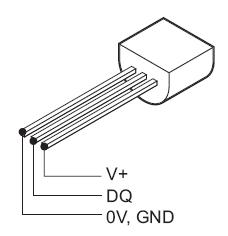
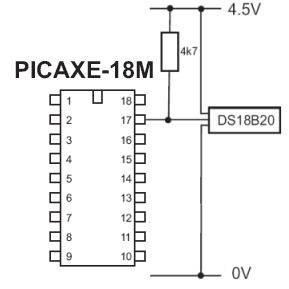
A Maxim DS18B20 added to the AXE050 board reads temperatures. The advantage of using Picaxe18M is that the same ports are used for control and programming.
Reading and control of AXE050 board is done using RS232 protocol. The onboard connections are used for RS232 control.
The firmware in AXE-050:
main:
serrxd ("c="),b0                     'gets first character after qualifier ("c=") from server
    if b0 = "n" then                 'looks for "on"
    high 2		             'turns on the output (start motor, turn on light, etc.)
    gosub get_status	             'calls up "get_status" subroutine below

    else if b0 = "f" then            'looks for "f" (off)
                                     'turns off the output
    gosub get_status	             'calls up "get_status" subroutine below

    else if b0 = "t" then            'looks for "t"
    gosub get_temp	             'calls up "get_temp" subroutine below
    sertxd (#b2, 13)	             'sends temp + LF to server
    else if b0 = "s" then            'looks for "s" (status)
    gosub get_status	             'calls up "get_status" subroutine below

    else if b0 = "l" then
    gosub get_lumin                  'call up reading ldr values
    sertxd (#b3, 13)
    endif
    goto main

    get_status:
    readoutputs b1
    gosub get_temp	            'calls temp subroutine below
    sertxd (#bit10 ,32, #b2, 32, #b3, 13) 'Sends status. light and temp to server.
                                    'Bit 10 is the on/off status of Out 2.
                                    'The bit is transmitted as an ASCII
                                    'character - ie,
                                    '0 = ASCII 48, 1 = ASCII 49.
    return

    get_temp:
    readtemp 0, b2	            'Reads the voltage on In 4; returns a value between 0 and 255,
                                    'eg, the least significant 8 bits (byte) of a 10-bit word.
                                    'This byte represents a voltage of 0 to approximately 1.25.
                                    'It's not necessary to read the most significant bits.
    return

    get_lumin:
    readadc 2, b3                   'read adc value on In2
    return
The main server
A Windows-based XAMPP server is installed in a PC. The server is hooked to a local network with a fixed local IP. The application is situated in a network that has no fixed public IP, hence DynDNS services is used. The router routes all external demands to the fixed local IP.
Windows XP and later do not allow easy RS232 control through Internet. To overcome such a blockage, RS232 control is done through DOS, using Kermit for DOS. Kermit is piped into PHP, and used to control the electronic devices on the AXE050. Kermit’s executable MSK316.exe is installed in same directory as all files. They will be in c:\xampp\htdocs
Note COM2 is used at baudrate of 4800 setup in Control Pannel of Windows XP.
LED ON Kermit script (name it ledon.ksc):
set port 2
set baud 4800
output c=n
exit 0
This script is called in a BATCH file (name it ledon.bat):
@echo off
c:\xampp\htdocs\msk316 take ledon.ksc
exit
LED OFF Kermit script (name it ledoff.ksc):
set port 2
set baud 4800
output c=f
exit 0
This script is called in a BATCH file (name it ledff.bat):
@echo off
c:\xampp\htdocs\msk316 take ledoff.ksc
exit
Get the temperature Kermit script (name it gettemp.ksc):
set port 2
set baud 4800
clear
output c=t
input /nowrap</div>
This script is called in a BATCH file (name it gettemp.bat):
@echo off
c:\xampp\htdocs\msk316 take gettemp.ksc
exit
Get the lighting luminance Kermit script (name it getilum.ksc):
set port 2
set baud 4800
clear
output c=l
input /nowrap
This script is called in a BATCH file (name it getilum.bat):
@echo off
c:\xampp\htdocs\msk316 take getilum.ksc
All batch files are then converted into .exe using Bat_to_Exe_Converter. Finally the php codes.
index.php file is:
<?php

echo "<head><meta http-equiv=\"Content-Type\" content=\"text/html; charset=iso-8859-1\">
<title>Internet Control of a Picaxe</title>
</head>
<body>
<font face=\"arial, sans-serif\">
<h2 align='center'>Internet Control of a Picaxe</h2>
<hr align='center' size=\"4\" color=\"orange\">
<h4>Online Control Room (AXE-050 with PICAXE-18M + XAMPP)</h4>
<h5>Choose a command:</h5>";
echo "<font size=\"-1\"><b><p><a href=\"onoffled.php\">
Live Alarm On/Off</a></p>
<p><a href=\"processing.php?action=ilum\">

Local Lighting</a></p>
<p><a href=\"processing.php?action=tem\">

Local Temperature</a></p>
<p><a href=\"temp_graph.php\">Temperature Log</a></p>

<hr align='center' size=\"4\" color=\"orange\">

<font size=\"-1\">Special thanks to <a href=\"http://www.maxmcarter.com/picaxe/picaxe_server.html\">Max Carter</a> for the inspirations and code of Picaxe project. For more information check <a href=\"http:/redacacia.wordpress.com\">Redacacia WordPress Blog</a><p>

</font>";

?>
processing.php file is:
<?php
//check the GET actions variable to see if something needs to be done
if (isset($_GET['action'])) {
//Action has been requested
if ($_GET['action'] == "tem") {
$page = "index.php";
header("Refresh: 2; URL=\"" . $page . "\"");
exec ('gettemp.exe',$status);
$pieces = explode(' ', $status[1]);
echo "<hr align='center' size=\"4\" color=\"orange\"><br>
<b><font face=\"arial, sans-serif\"><font color=blue>Local Temperature:</b></font></font><br>";
echo "<font face=\"arial, sans-serif\"><b>".$pieces[1]." ºC</b></font>";
}
else if ($_GET['action'] == "ilum") {
$page = "index.php";
header("Refresh: 2; URL=\"" . $page . "\"");
exec ('getilum.exe',$status);
$pieces = explode(' ', $status[1]);
echo "<hr align='center' size=\"4\" color=\"orange\"><br>
<b><font face=\"arial, sans-serif\"><font color=blue>Local Lighting:</b></font></font><br>";
if ($pieces[1] >= 20) {
echo "<font face=\"arial, sans-serif\"><b>With Light</b></font>";
}
else {
echo "<font face=\"arial, sans-serif\"><b>In Darkness</b></font>";
}
}
}
?>
processing1.php file is:
<?php

//check the GET actions variable to see if something needs to be done
    if (isset($_GET['action'])) {
    //Action has been requested
    if ($_GET['action'] == "on") {
    //Turn LED on - for this simple script we are just looking for either a 1 or 0
    $page = "onoff.php";
    header("Refresh: 5; URL=\"" . $page . "\"");

    exec('ledon.exe');
    echo "<font face=\"arial, sans-serif\"><b>Switched ON</b></font>";
 }

     else if ($_GET['action'] == "off") {
      //Turn LED off
      //Now we "open" the serial port so we can write to it
     $page = "onoff.php";
     header("Refresh: 5; URL=\"" . $page . "\"");
     exec('ledoff.exe');
     echo "<font face=\"arial, sans-serif\"><b>Switched OFF</b></font>";
 }
}
?>
onoffled.php file is:
<?php
echo "<head><meta http-equiv=\"Content-Type\" content=\"text/html; charset=iso-8859-1\">
<title>Online Control of Alarm</title>
</head>
<body>
<font face=\"arial, sans-serif\">
<h5><<< <a href=\"index.php\">Return</a></h5>
<a href="onoff.php">onoff.php</a><br>
<a href="http://pxe/">http://pxe/</a>";
?>
onoff.php file is:
echo "
<div><strong> </strong><strong><a href="\">
Switched ON</a></strong> |  <a href="\">
Switched OFF</a>

</div>
";
?>
and finally tempgraph.php file is:
$tempdata = file_get_contents("templog.txt");
#reads file, this is the temp data
#left click on wamp tray icon, php, php extension and make it's a check symbol in front of php_gd2
$array = split(' ', $tempdata); #creates an array, split by ' ' (space)
#the following multiplies by 5 (for degrees F) and subtracts all values in array from 539;
#this number (539) is in pixels.  It can be varied to calibrate the vertical temp scale on the graph

$b = 0;		#$b is a pointer; points to the locations in the array
#there are 47 locations in the array

$dat_c = $array[0];
# °F = (°C * 1.8) + 32
$dat0 = $dat_c*1.8;
$dat = $dat0 + 32;

while ($b <= 47)  {

$array[$b] = 539 - (5 * $dat);#scales data as explained above; "vertical gain" = 5 pixels/degree
#this accomodates degrees F
#for degrees C, this should be changed to 9 pixels/degree

$b = ($b + 1);

$dat_c = $array[$b];
$dat0 = $dat_c*1.8;
$dat = $dat0 + 32;

}

$graph = ImageCreate(570,360);      #creates image(x[pixels],y[pixels]), starts in upper lefthand corner

$white = ImageColorAllocate($graph,255,255,255);  #specifies color (RGB), first color is backgound color
$black = imagecolorallocate($graph,0,0,0);
$red = imagecolorallocate($graph,255,0,0);
$blue = imagecolorallocate($graph,0,0,255);
$gray = imagecolorallocate($graph,240,240,240);
$dkgray = imagecolorallocate($graph,180,180,180);

imagerectangle($graph,50,1,515,289,$black);  #specifies rectange ($name,line x1,y1,x2,y2[diagonal corners],$color)

#the following draws the graticle lines: gray, dark gray.

$y = 10;		#$y is vertical pixels
while ($y <= 279)  {
imageline($graph, 50,$y,514,$y, $gray);
$y = ($y + 9);
}

$y = 10;
while ($y <= 289)  {
imageline($graph, 50,$y,515,$y, $dkgray);
$y = ($y + 45);
}

#the following generates the hash marks on the left vertical scale

$y = 2;
while ($y <= 279)  {
imagestring($graph,5,46,$y,'-',$black); #specifies character [string] ($name,font size,x,y,'chr',$color)
$y = ($y + 9);
}

#the following generates the hash marks on the right vertical scale
$y = 2;
$f = 104;
while ($y <= 274)  {
imagestring($graph,5,512,$y,'-',$black);      #specifies character [string] ($name,font size,x,y,'chr',$color)
$y = ($y + 5);

}

imagestring($graph,5,10,2,'C',$red);	#places red "C" and "F" on the graph
imagestring($graph,5,558,2,'F',$red);

#the following generates the numbers on the left vertical scale, C

$y = 2;
$c = 40;
while ($y <= 280)  {
imagestring($graph,3,27,$y,$c,$black); #specifies character [string] ($name,font size,x,y,'chr',$color)
$y = ($y + 9);
$c = ($c - 1);
}

while ($y <= 272)  {
imagestring($graph,3,34,$y,$c,$black);
$y = ($y + 9);
$c = ($c - 1);
}

#the following generates the numbers on the right vertical scale, F

$y = 3;
$f = 104;
while ($y <= 282)  { imagestring($graph,3,524,$y,$f,$black);   #specifies character [string] ($name,font size,x,y,'chr',$color) $y = ($y + 10); $f = ($f - 2); } imagestring($graph,5,1,291,'Hour#',$black);    #'day', (today) and "^" on horizontal scale imagestring($graph,5,48,306,'^',$black); imagestring($graph,5,48,311,'!',$black); imagestring($graph,2,26,322,'(Now!)',$black); imagestring($graph,2,125,322,'>>>>> Preceding Hours >>>>>',$black);

#the following generates the hash marks on the horizontal scale

$x = 42;				#$x is horizontal pixels
while ($x <= 510)  {
imagestringup($graph,5,$x,293,'-',$black);#specifies character [string] ($name,font size,x,y,'chr',$color)
#"up" rotates the character 90 degrees
$x = ($x + 10);
}

#the following adds the first 9 numbers on the horizontal scale to the graph paper
$x = 48;   #sets first x value, position of first hour
$hr = 1;   #sets first hour number
while ($x <= 208)
{

imagestring($graph,3,$x,293,$hr,$black);  #draws the number on the graph
$x = $x + 20;  #moves 20 pixels to the right
$hr = $hr + 1;  #adds one hour
}

#the following adds the next 15 numbers on the horizontal scale to the graph paper
$x = 224;
while ($x <= 504)
{

imagestring($graph,3,$x,293,$hr,$black);  #draws the number on the graph
$x = $x + 20;  #moves 20 pixels to the right
$hr = $hr + 1;  #adds one hour
}

#the following draws the data plot onto the "graph paper"
$x1 = 50;			#sets lefthand starting point, x1, to 50 pixels
$y1 = $array[0];	#sets lefthand starting point, y1, to the first calculated y value (from above)
$x2 = 60;			#sets ending point of first segment, x2, to 60 pixels
$y2 = $array[1];	#sets ending point of first segment, y2, to the second calculated y value (from above)
$b = 1;				#this tells the while loop where to start

while ($x1 <= 500) { imageline($graph, $x1, $y1, $x2, $y2, $blue);   #draws the segment $x1 = $x1 + 10;                              	#moves segment start point 10 pixels to the right $x2 = $x2 + 10;					#moves segment end point 10 pixels to the right $y1 = $array[$b];				#segment y1 value (segment start data) $b = $b + 1;					#increments "b" value (pointer) $y2 = $array[$b];				#segment y1 value (segment end data) } ImagePNG($graph, 'graph.png');  #writes the image to file "graph.png" header ("Content-type: image/png");  #header tells the browser that a png image follows     ImagePNG($graph);                #sends image to browser     ImageDestroy($graph);           #erases image from memory (frees up memory) ?>
Now the above php file will not generate a graph unless we have some data. Create a txt file with the name templog.txt and paste into it the following data (note speace between number:
25 25 25 24 24 22 22 22 22 23 23 22 22 23 23 23 23 23 24 27 27 27 27 27 27 27 27 27 27 27 27 27 27 27 27 27 27 25 24 24 24 24 24 24 21 21 21 26 25 25 25 25 25 25 25 25 24 24
To register temperatures at regular time (say every half an hour) a schedule is created calling templog.php with following php code:
<?php

//Log temperature
 echo "<body onLoad=\"setTimeout(window.close, 5000);\">";

 $file = "templog.txt";
 $fh = fopen($file, "r");
 $fcontent = fread($fh, filesize($file));

 exec ('gettemp.exe',$status);

 $pieces = explode(' ', $status[1]);
 $dado = $pieces[1];
 $towrite = "$data $fcontent";

 $fh2 = fopen($file, 'w+');
 fwrite($fh2, $towrite);
 fclose($fh);
 fclose($fh2);
?>
One last thing
In order to view the LED switching on and off a webcam setup is required, (in our case a cheap Logitech webcam). In order to stream video YAWCAM freeware is advised. Having the requirements mentioned on the YAMCAM website one can easily establish a streaming server. The streaming server is set as a Proxy in httpd.conf of Apache of main XAMPP server. In our case it is called in pxe/ directory. Here is an image of video being streamed:
Acknowledgments
A special thanks to Max Carter for sharing the PICAXE and graphic display codes.
Viewing the project:
The project was on online but has been removed for difficulties in maintaining it.
More details are to follow…
—————————
Addenda dated August 25th, 2010:
set line COM2
has been deleted in .ksc codes and replaced with (shown in red):
set port 2
set baud 4800


Pingback: Voice Operated Internet Control of a PICAXE | RedAcacia
Pingback: Voice Operated Internet Control of a PICAXE (Part II) | RedAcacia
Sorry, I know this is not exactly in the same topic, but I saw how you interfaced RS 232, I am new to microcontrollers. If you can share some of your expertise with me. I want to interface an RS 232 serial port with my PICAXE 28X2 chip, thanks in advance for your help 🙂
Pingback: Fwd: Internet Control of a Picaxe | RedAcacia | Simo Järvelöv