
Introduction
The Micro Bit also referred to as BBC Micro Bit, stylised as micro:bit is an ARM-based embedded system designed by the BBC for use in computer education.

In my previous tutorial I showed how to read temperature with a purpose written app in App Inventor for Android phone that connects to BBC micro:bit through Bluetooth Low Energy (BLE). With an edge connector more pins can be accessed facilitating connection to other devices. Despite BBC micro:bit having hardware capable of allowing the device to work as a BLE device, it has disadvantage that only has 16k of RAM. The BLE stack alone takes up 12k RAM which means there is little room to run MicroPython and bigger codes.
Objectives
Build a simple BBC micro:bit Robot. Write the code, using the simplest ways, for the BBC micro:bit and Android smartphone, and test the setup.
Requirements
- BBC micro:bit
- Edge-connector for BBC micro:bit: We used RKub2-Powered-Edge-Connector

- Robot platform: We used R2Bot from Inex:

- L298 H-bridge module:

- Two battery holders for powering BBC micro:bit and L298 H-module seoarately
- Easy cables connections
- Mini-USB cable connector for programming
- A smartphone with Bluetooth Low Energy BLE
Circuit
Our proposed circuit is as shown below and note that we removed the jumpers of ENA and ENB in order to control the speed of motors,

Setup
Build the Robot, something similar to my mounting below:


1. Coding the BBC micro:bit
Coding can be of several type offered for BBC micro:bit. You can code your BBC micro:bit using Blocks, JavaScript, Python, and mbed platform. We will use Javascript offered at http://microbit.org/code/ to install the firmware in simplest way.
To use Bluetooth in your micro:bit application you first need to add the Bluetooth package to your project using the menu More/Add Package.

Once this is done (you may receive a warning of some incompatibilities, but do accept them) , you will have a complete collection of Bluetooth related Blocks with which can build the Bluetooth capabilities of your application. Many are very simple and merely result in a given Bluetooth service being available at run-time. But there are also blocks which provide access to Bluetooth connect and disconnect events and the Bluetooth UART service can be used to transmit arbitrary data to a connected peer or to receive data from a peer service.
The following image shows all the the blocks that will become available

Now you are ready to write the code. Let’s code! We will write the following code in Javascript:
let uartData = ""
let connected = 0
bluetooth.onBluetoothDisconnected(() => {
    basic.showIcon(IconNames.No)
    connected = 0
    motorsoff()
})
bluetooth.onBluetoothConnected(() => {
    basic.showIcon(IconNames.Yes)
    connected = 1
    while (connected == 1) {
        uartData = bluetooth.uartReadUntil(serial.delimiters(Delimiters.NewLine))
        if (uartData.charAt(0) == "S") {
            motorsoff()
            basic.showLeds(`
            . . . . .
            . . . . .
            . . # . .
            . . . . .
            . . . . .
            `)
        }
        if (uartData.charAt(0) == "F") {
            motorson()
            pins.digitalWritePin(DigitalPin.P5, 1)
            pins.digitalWritePin(DigitalPin.P12, 0)
            pins.digitalWritePin(DigitalPin.P0, 1)
            pins.digitalWritePin(DigitalPin.P8, 0)
            basic.showArrow(ArrowNames.North)
        }
        if (uartData.charAt(0) == "B") {
            motorson()
            pins.digitalWritePin(DigitalPin.P5, 0)
            pins.digitalWritePin(DigitalPin.P12, 1)
            pins.digitalWritePin(DigitalPin.P0, 0)
            pins.digitalWritePin(DigitalPin.P8, 1)
            basic.showArrow(ArrowNames.South)
        }
        if (uartData.charAt(0) == "L") {
            motorson()
            pins.digitalWritePin(DigitalPin.P5, 0)
            pins.digitalWritePin(DigitalPin.P12, 0)
            pins.digitalWritePin(DigitalPin.P0, 1)
            pins.digitalWritePin(DigitalPin.P8, 0)
            basic.showArrow(ArrowNames.East)
        }
        if (uartData.charAt(0) == "R") {
            motorson()
            pins.digitalWritePin(DigitalPin.P5, 1)
            pins.digitalWritePin(DigitalPin.P12, 0)
            pins.digitalWritePin(DigitalPin.P0, 0)
            pins.digitalWritePin(DigitalPin.P8, 0)
            basic.showArrow(ArrowNames.West)
        }
    }
})
basic.forever(() => {
    bluetooth.startUartService()
})
basic.showString("I LOVE FAIZ")

function motorson() {
    pins.analogWritePin(AnalogPin.P2, 500)
    pins.analogWritePin(AnalogPin.P1, 500)
}

function motorsoff() {
    pins.digitalWritePin(DigitalPin.P2, 0)
    pins.digitalWritePin(DigitalPin.P5, 0)
}
Save the code giving it a name. And download the respective .hex file. I have also provided the hex file you can download from here. At this stage you should connect the BBC micro:bit to your PC (in my case with Windows 7 OS).

You are now ready to install the firmware in BBC micro:bit which behaves like a drive in your PC and will be visible. You will need to copy, or drag and drop, the hex file into BBC micro:bit:
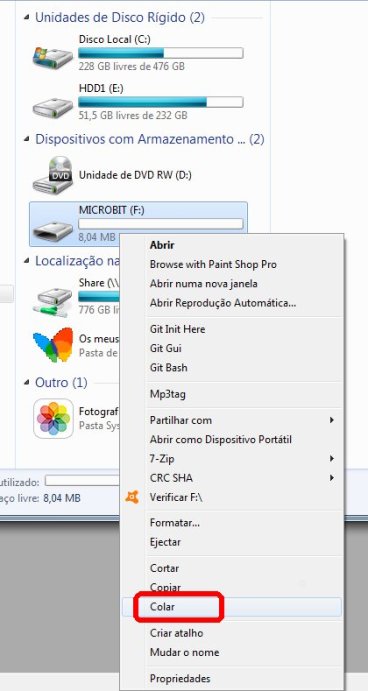
The hex file once dropped or pasted (“Colar” in above image means “Paste”) will install itself in BBC micro:bit, and run.

NOTE: I have since written an mbed code with slight modifications to connections to BBC micro:bit. You can find the direct link here.
2. Writing the App for Android
We will write now an App for Android smartphones using visual programming. MIT has MIT App Inventor (now version 2) that we will use to write the App.
MIT App Inventor is an open-source web application originally provided by Google, and now maintained by the Massachusetts Institute of Technology (MIT).
It allows newcomers to computer programming to create software applications for the Android operating system (OS). It uses a graphical interface, very similar to Scratch and the StarLogo TNG user interface, which allows users to drag-and-drop visual objects to create an application that can run on Android devices. In creating App Inventor, Google drew upon significant prior research in educational computing, as well as work done within Google on online development environments.
MIT App Inventor and the projects on which it is based are informed by constructionist learning theories, which emphasizes that programming can be a vehicle for engaging powerful ideas through active learning. As such, it is part of an ongoing movement in computers and education that began with the work of Seymour Papert and the MIT Logo Group in the 1960s and has also manifested itself with Mitchel Resnick‘s work on Lego Mindstorms and StarLogo.
MIT App Inventor is also supported with the Firebase Database extension. This allows people to store data on Google’s firebase.
a) Register yourself at http://ai2.appinventor.mit.edu/ using a Google or other accepted email account. We will first add Bluetooth Lower Energy blocks to MIT App Inventor-
b) First and foremost we need now to add the necessary extension. In the Palette windows click on Extension at the bootm and then on “Import extension” and click on “URL”. Paste the URL:
http://iot.appinventor.mit.edu/assets/com.bbc.microbit.profile.aix
c) I have done all the hard work and written the whole code that you can download from here. The file is named RobotControl.aia is made available at github.com repository that you can import into your MIT App Inventor account. You will, once imported, have to build and compile, and export the application with .apk extension into your Android phone, and install. You will find plenty of information in Internet on how to do it. If you are too lazy to do itor find difficult you can download the apk from here.
I have Voice so every time the robot is controlled a female robotic voice is heard on the phone, courtesy of text2speech site that converts text to mp3 for us.
If you have difficulties for any parts of this tutorial do not hesitate to contact me.
3) Pairing Android phone with BBC micro:bit
Making your BBC micro:bit pair requires you to follow some simple steps which will be described shortly. What you do with the device you’re pairing it to will vary slightly depending on what that device is. We’ll look at how it’s done with common smartphones and tablets here too.
To get your micro:bit ready for pairing do the following:
- Hold down buttons A and B on the front of your micro:bit together. The front is the side with two buttons and the LED display. Keep the two buttons held down. Don’t let go of them yet!
- While still holding down buttons A and B, press and then release the reset button on the back of the micro:bit. Keep holding down buttons A and B.
- You should see “PAIRING MODE!” start to scroll across the micro:bit display. When you see this message start to appear you can release buttons A and B.
- Eventually you’ll see a strange pattern on your micro:bit display. This is like your micro:bit’s signature. Other people’s micro:bits will probably display a different pattern.
Your micro:bit is now ready to be paired with the other device.
4)Installing the App on Android phone
If you have installed the apk compiled from the .aia file (or the downloaded one) that I have provided you will see the following icon in your Android phone inside the red square:

Click on icon to start the App. Click on Scan button:

You will see the paired BLE devices including BBC micro:bit. Click on white letters containing data on the device that is paired that will become grey, and next click on Connect button:

If all is well you will see the Status as Connected:

You will see the right sign on the BBC micro::bit robot and you will hear a female robotic voice in your Android phone saying “micro:bit Robot at your service!”.

If Bluetooth is disconnected by pressing Disconnect button or for any other reason, the display will show X which means disconnected!
5) Test your Robot
With swipe gesture on the screen in UP direction you will make our Robot move forward, and the female robotic voice in your phone saying “Forward”. If your swipe on the screen is in DOWN direction that will make the robot move backward, and again you hear the female robotic voice saying “Backward”. Swipe gesture to the LEFT will turn the robot to the left, and again the voice saying “Left”, and swipe gesture to RIGHT will turn the robot to the right, and the voice saying “Right”. If you click on the Stop / Reset button it will stop the robot, and the voice will say “Stop!”. Also you will see arrows on the display of the micro:bit. If you click on Disconnect button you will hear the voice saying “Goodbye!” and communication to the Robot will be lost.
Demo Video
Conclusions
Of course you can do more things with the Robot, for exmple detect obstacles and automatically make robot turn back, to avoid the obstacle and turn, etc. If you do use any parts of my tutorial, please acknowledge my work with links to this blog.
Acknowledgments
A special thank you to Github for providing their free repository to facilitate sharing. MIT App Inventor and Microbit coding site also have special right to acknowledgements for their free services. Also a special mention is due to Bit:Bot Tutorial website for inspiring me with code for Bluetooth UART.
I think I am the first person to share the whole project for micro:bit and writing an App for Android with App Inventor. May be I am wrong, and if I am please correct me.
DISCLAIMER
THE SOFTWARE HERE IS PROVIDED “AS IS”, WITHOUT WARRANTY OF ANY KIND, EXPRESS OR IMPLIED, INCLUDING BUT NOT LIMITED TO THE WARRANTIES OF MERCHANTABILITY, FITNESS FOR A PARTICULAR PURPOSE AND NONINFRINGEMENT. IN NO EVENT SHALL THE AUTHORS OR COPYRIGHT HOLDERS BE LIABLE FOR ANY CLAIM, DAMAGES OR OTHER LIABILITY, WHETHER IN AN ACTION OF CONTRACT, TORT OR OTHERWISE, ARISING FROM, OUT OF OR IN CONNECTION WITH THE SOFTWARE OR THE USE OR OTHER DEALINGS IN THE SOFTWARE.
