
Objectives:
To build a thermometer, with a Cypress PSoC chip CY8C27643 and 1-wire DS18B20 temperature sensor.
Introduction
PSoC (Programmable System-on-Chip) is a family of integrated circuits made by Cypress Semiconductor. These chips include a CPU and mixed-signal arrays of configurable integrated analog and digital peripherals.
PSoC is used in devices as simple as Sonicare toothbrushes and Adidas sneakers, and as complex as the TiVo set-top box. One PSoC, using CapSense, controls the touch-sensitive scroll wheel on the Apple iPod click wheel.
PSoC is a software configured, mixed-signal array with a built-in MCU core. There are three different family of devices (2009):
- CY8C2xxxx Named PSoC1 with CPU M8C
- CY8C3xxxx Named PSoC3 with CPU 8051
- CY8C5xxxx Named PSoC5 with CPU ARM Cortex M3
PSoC has three separate memory spaces: paged SRAM for data, Flash memory for instructions and fixed data, and I/O Registers for controlling and accessing the configurable logic blocks and functions. The device is created using SONOS technology.
PSoC resembles an ASIC: blocks can be assigned a wide range of functions and interconnected on-chip. Unlike an ASIC, there is no special manufacturing process required to create the custom configuration – only startup code that is created by Cypress’ PSoC Designer IDE.
PSoC resembles an FPGA in that at power up it must be configured, but this configuration occurs by loading instructions from the built-in Flash memory. Unlike an FPGA, the current generation of PSoC cannot have its digital functions reprogrammed by VHDL or Verilog, it can only be configured with register settings.
PSoC most closely resembles a microcontroller in usage, where code is run to interact with the user-specified peripheral functions (called “User Modules”), using automatically generated APIs and interrupt routines. The PSoC Designer IDE generates the startup configuration code and peripheral APIs automatically based upon the users selections in a Visual-Studio-like GUI.
Cypress offers a visual, code-free embedded design tool for PSoC called PSoC Express. Using PSoC Express, most features of the PSoC can be accessed with drag and drop icons and logical expressions. The visual design is compiled to executable code without exposing the user to the underlying converted code, though a visual design can be converted and used as a basis of a traditional code-based design in PSoC Designer. Visual design elements cover features such as temperature sensors, fan control, accelerometers, I2C master and slave protocols, USB virtual serial ports, capacitive sensors, and wireless 2.4 GHz radio communications.Cypress Semiconductor introduced a new family in it’s PSoC 3 architecture. Programmable Digital PSoC 3 Family allows the integration of digital peripherals along with PWMs, Timers, Counters, UARTs, glue logic and state machines.It also offers customizable digital functions and interfaces, which lowers overall system power by migrating traditional CPU functions to programmable digital logic.
Required Equipment:
Mikroelektronica’s EasyPSoC4 Development Board, Dallas 1-wire sensor DS18B20 and LCD 2×16 (these last two devices are supplied with EasyPSoC4).
Pre-Requirements:
Needless to say one must have some C-language programming knowledge, and basic notions of PSoCs, namely about the Cypress chip CY8C27643. PSoC Designer must be already installed in one’s PC, with C-language programming from Imagecraft default option (Imagecraft allows free usage for 45 days).
Building the Circuit:
On EasyPSoC4 board (which includes as standard the Cypress CY8C27643 PSoC DIL), install the 2×16 LCD and DS1820 temperature sensor (both included with the kit). Ensure that the display GLCD is not mounted on EasyPSoC4.

Fig. 1 circuit diagram of DS18B20 mounted on EasyPSoC4 board
NOTE: Switch 1 of SW3 should be placed in the ON position (and switch 2 OFF), as in this application we will be using port P0-2 of the PSoC to connect the DS1820 sensor) .

Fig 2: Circuit diagram showing connections between the temperature sensor and LCD 2×16
Experiment:
1 – Installation of 1-wire module
If 1-wire module is not already installed in PSoC Express software, it is available on Cypress site at:
http://www.psocdeveloper.com/uploads/media/OneWire_v1.3.3.zip
Place OneWireSW zip in C:\Program Files\Cypress MicroSystems\PSoC Designer\Data\Stdum, and afterwards run Cypress Expresssoftware . Close any open project. Run Refresh Manifest which is found in menu Tools, so that the module becomes available.
2 – Project
a) Start a new project in PSoC Designer, giving it a name, say for example DS1820. The software will ask you if you want create a new directory, to which you will respond pressing on Yes button. In the following screen we choose C, pressing the button to conclude.
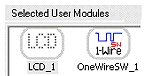
In PSoC Designer choose LCD, which is found inside Misc
Digital of the module User Module Selection, pressing twice over the LCD icon. Next choose OneWireSW which is found within Digital Misc of the User Module Selection, pressing twice over the OneWireSW icon.
Selected User Modules will contain both icons, as can be seen:
Press the button (Interconnect View)

so that you can setup the connections within PSoC.
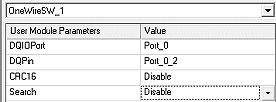
For on OneWireSW the following selections are made:
For LCD the following selections are made:

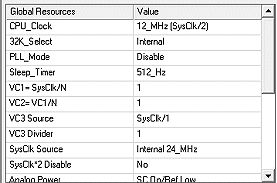
In Gobal Resources change the clock to 12_MHz (Sys_Clk/2), leaving out the rest of parameters as they appear:
e) Next, press the button (Generate Application)
The PSoC Designer will generate the applications.
f) Now, press the button (Application Editor)
Within the folder1820 files and sub-folder Source files, open the file main.c. It will contain a default code generated automatically. Substitute the code with following code:
//----------------------------------------------------------
// C main line
// Themperature Measurement with DS18B20
// Author: Tayeb Habib – https://redacacia.wordpress.com
// Adaptation from http://narong.engr.tu.ac.th/microlab/doc
//----------------------------------------------------------------
#include         // specification of constants and macros
#include "PSoCAPI.h"    // Definitions of PSoC API for all modules
#include

char TextBuff[5];
unsigned char TLSB, TMSB, TempI;
int TempP;

void main()
{
    LCD_1_Start();
    LCD_1_Position(0,0);
    LCD_1_PrCString("1-Wire & DS18B20");
    OneWireSW_1_Start();	            //initiates 1-Wire

    while(1)
    {
        OneWireSW_1_Reset();	            //reset of 1-Wire
        OneWireSW_1_WriteByte(0xCC);        //skip ROM
        OneWireSW_1_WriteByte(0x44);        //temperature conversion

        OneWireSW_1_Delay10mTimes(90);      //waits 900ms for
                                            //conversion

        OneWireSW_1_Reset();	            //reset of 1-Wire
        OneWireSW_1_WriteByte(0xCC);        //skip ROM
        OneWireSW_1_WriteByte(0xBE);        //Scratch Pad reading
                                            //instruction
        TLSB = OneWireSW_1_ReadByte();      //read LSB data
        TMSB = OneWireSW_1_ReadByte();      //read MSB data
        TempI = (TLSB >> 1) & 0x7F;
        TempI = TempI | (TMSB & 0x80);      //temperature whole
                                            //numbers format
        TempP = TLSB & 0x01;	            //binary point
                                            //of temperature
        itoa(TextBuff,TempI,10);	    //data conversion to
                                            //ASCII
        LCD_1_Position(1,0);	            //position on LCD
        LCD_1_PrCString("Temp =  ");        //write data on LCD
        LCD_1_PrString(TextBuff);

        TempP = TempP * 5;	            //convert to decimal
                                            //point
        itoa(TextBuff,TempP,10);           //show decimal point
        LCD_1_PrCString(".");
        LCD_1_PrString(TextBuff);
        LCD_1_PrCString(" C ");
    }
And finally press the e button (Build)

The resultcan be on the window Build in the lower part of PSoC Designer workspace,
Starting MAKE...
creating project.mk lib/lcd_1.asm lib/onewiresw_1.asm lib/psocconfig.asm lib/psocconfigtbl.asm
./boot.asm
./main.c
Linking..
ROM 13% full. 2088 bytes used (does not include absolute areas).
RAM 8% full. 23 bytes used (does not include stack usage).
ds1820 - 0 error(s) 0 warning(s) 15:37:06
ds1820.hex is generated, which will be now used n programming he PSoC on the EasyPSoC4 board. After the hex is uploaded, the LCD 2×16 will show room temperature, which you can change by touching DS18B20 with a finger.
Final considerations
Add a buzzer to the ircuit so that PSoC will play a tone, everytime the DS18B0 reads a certain temperature that has been predefined by you.
References

Sorry, but a did not understand this
”
TempI = (TLSB >> 1) & 0x7F;
TempI = TempI | (TMSB & 0x80);
TempP = TLSB & 0x01;
”
and this
”
TempP = TempP * 5;
”
Can you explain me concretely these functions?
Welcome to my blog.
Effectively it is data manipulation to get useful values to be read.
LSB means Least Significant Bit.
So you are getting values that the compiler allows you to manipulate.
Try changing the parameters to see what is happening.
I suggest also the reading the compilers’ help.
I could this exercise for you but then you will not learn.
So I suggest you find it by yourself.
Note I am sharing knowledge that hopefully will allow the interested visitor to learn.
I challenge you to post here an explanation. This will be an act of giving back.
If really at the end you do not find out what is being done come back here and I will try to help you.
I think the
”
TempI = (TLSB >> 1) & 0x7F;
TempI = TempI | (TMSB & 0×80);
”
is to assembly the lsb and the msb, to make just a one information of temperature.
But the others, I don’t see.
Exact. The rest is also clearly verifiable. Try to make changes and to verify the effect.
Yes, but how i can verify the effet ?
I’ve try to print the effect on the monitor with the rs232, but it doesn’t work.
and where do you find the code for assembly the lsb and the msb ?
If you read the article you will notice I am using a LCD display for monitoring.