
Introduction
When upgrading a router such as TP-Link´s MR3420, if one does not take adequate measures, one risks to brick it. That is exactly what I did with my TL-MR3420 v1 router. The only way to debrick this router is through a serial TTL cable. I will show here how to do it.
Requirements
You need to know a bit about soldering, and have a bit of cabling skills and adequate tools such as a crimping tool.
Preparation of the serial TTL cable
You will need a serial TTL cable. This is not the same as ordinary RS232 cable used in PCs such as USB->RS232 cable .
If you dont own a serial TTL cable, it is easy to make one. You need to buy a cheap Data cable DKU-5 or CA-42 (I bought a DKU-5 cable from a local Indian shop for 6,00€)

DKU-5 cable is used for data connection in old Nokia phones. Cut the cable at extreme end next to Nokia connector as shown, and expose the wires:

In my case the DKU-5 cable has 3 wires. You need to know which wire corresponds to what i.e. Tx, Rx and Ground required for TTL connections on the router.
It is quite easy! You just need to use a multimeter, and check continuity on the NOKIA connector, that is which wire corresponds to what for Tx, Rx and Ground:

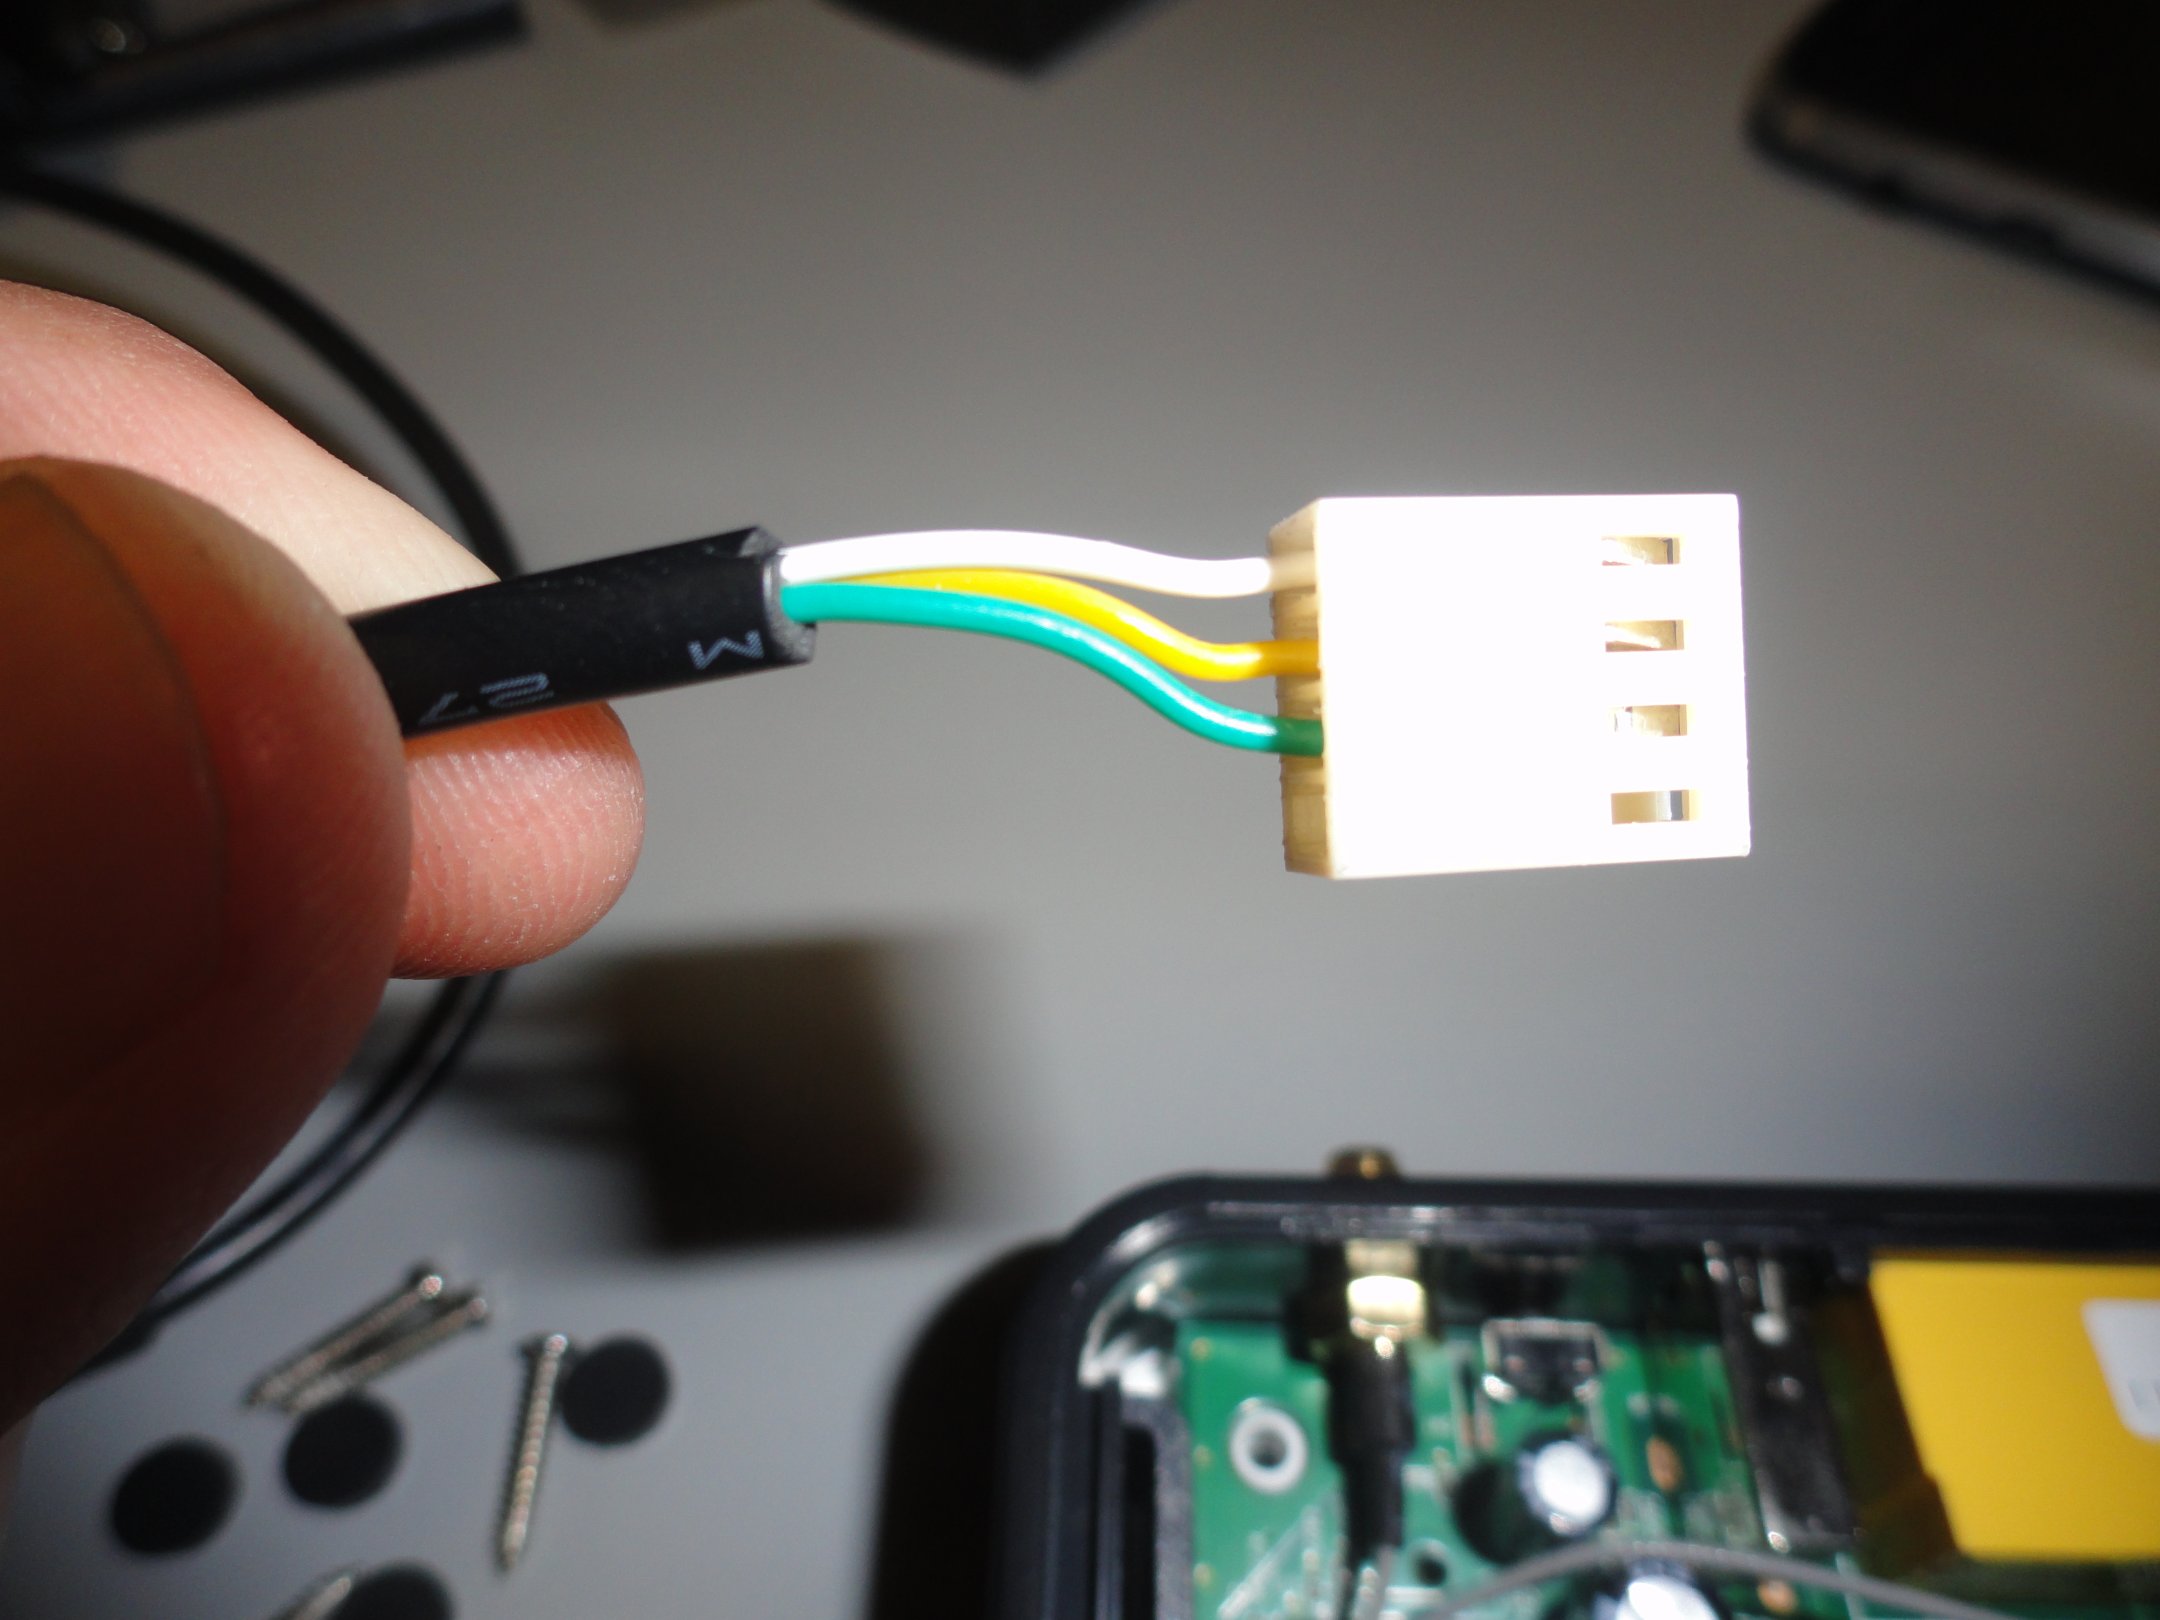
In my case white wire corresponds to Tx, yellow corresponds to Rx and green corresponds to Ground. I crimped the wires at cable end with Molex crimps as shown (we are going to use Molex connectors):

If you want to learn to crimp, there are nice Youtube videos showing how to do it.
Before finishing touches with the serial TTL cable, we need to go forward and prepare the router for programming with this cable.
Opening and preparing the router
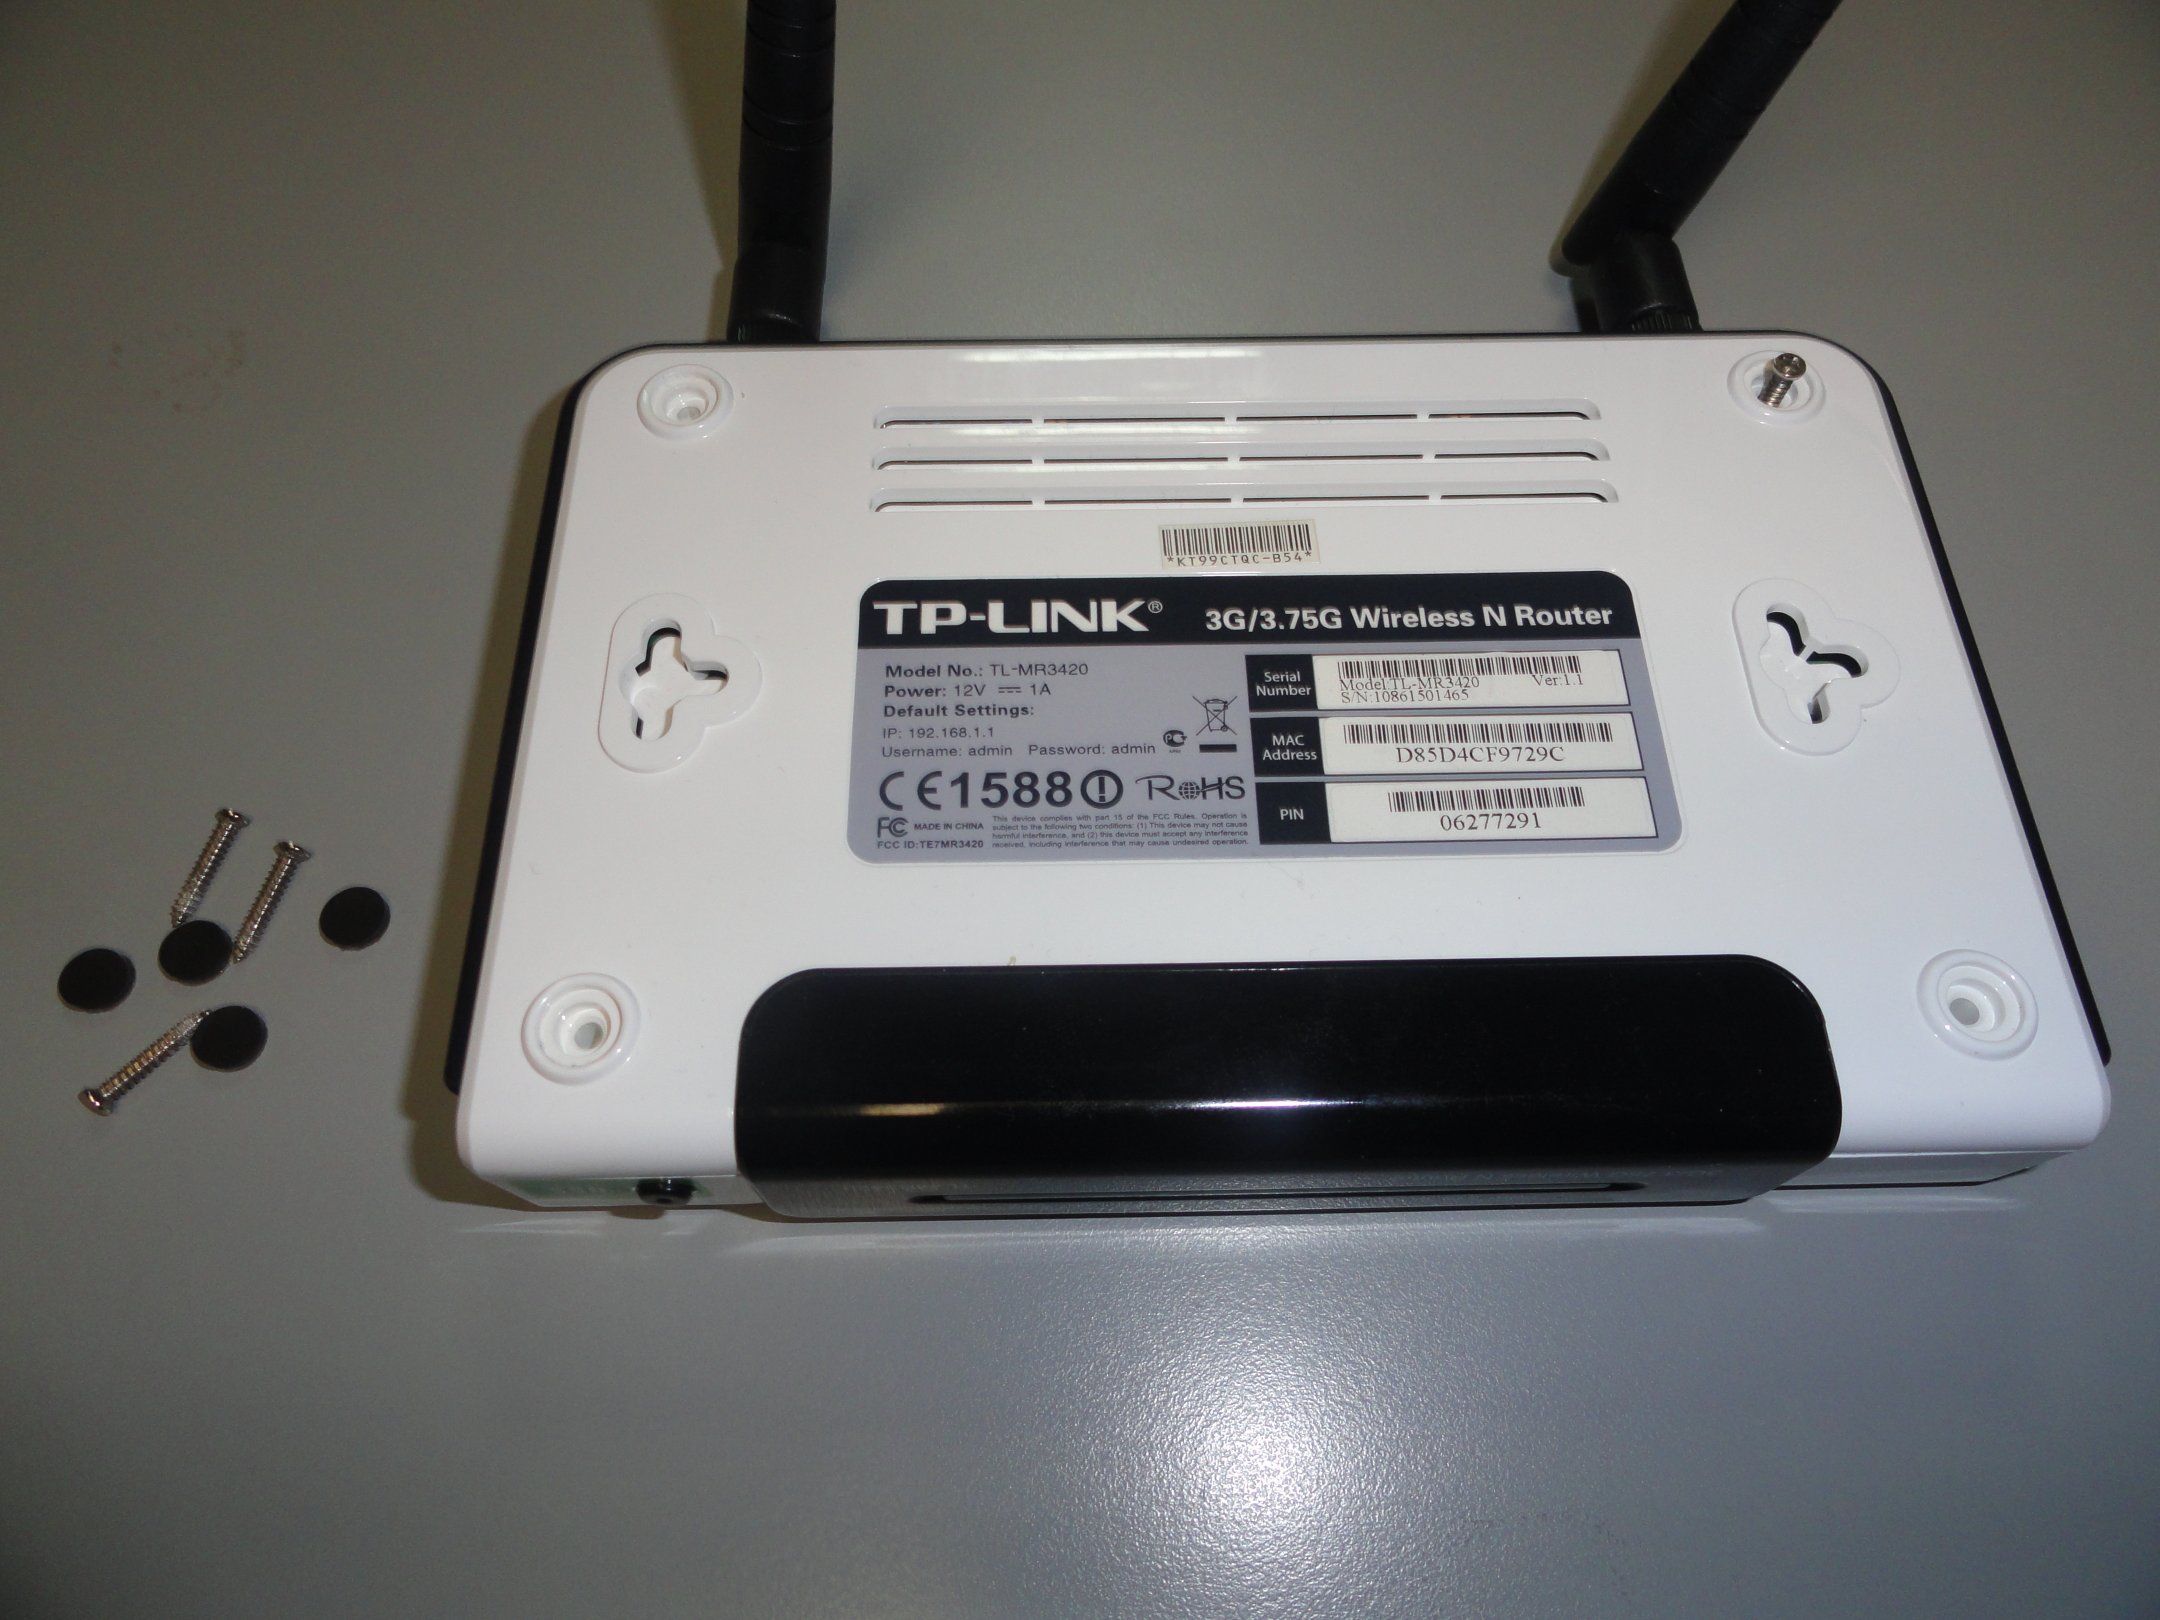
On the bottom side of the router, there are four round rubber pads that you will need to remove , and below these you will find four screws that you have to unscrew in order to open the router:
Avoid static electricity as it can cause real damage to your router! The easiest way to dissipate static electricity is to use an antistatic wrist strap, which connects to your local AC ground.
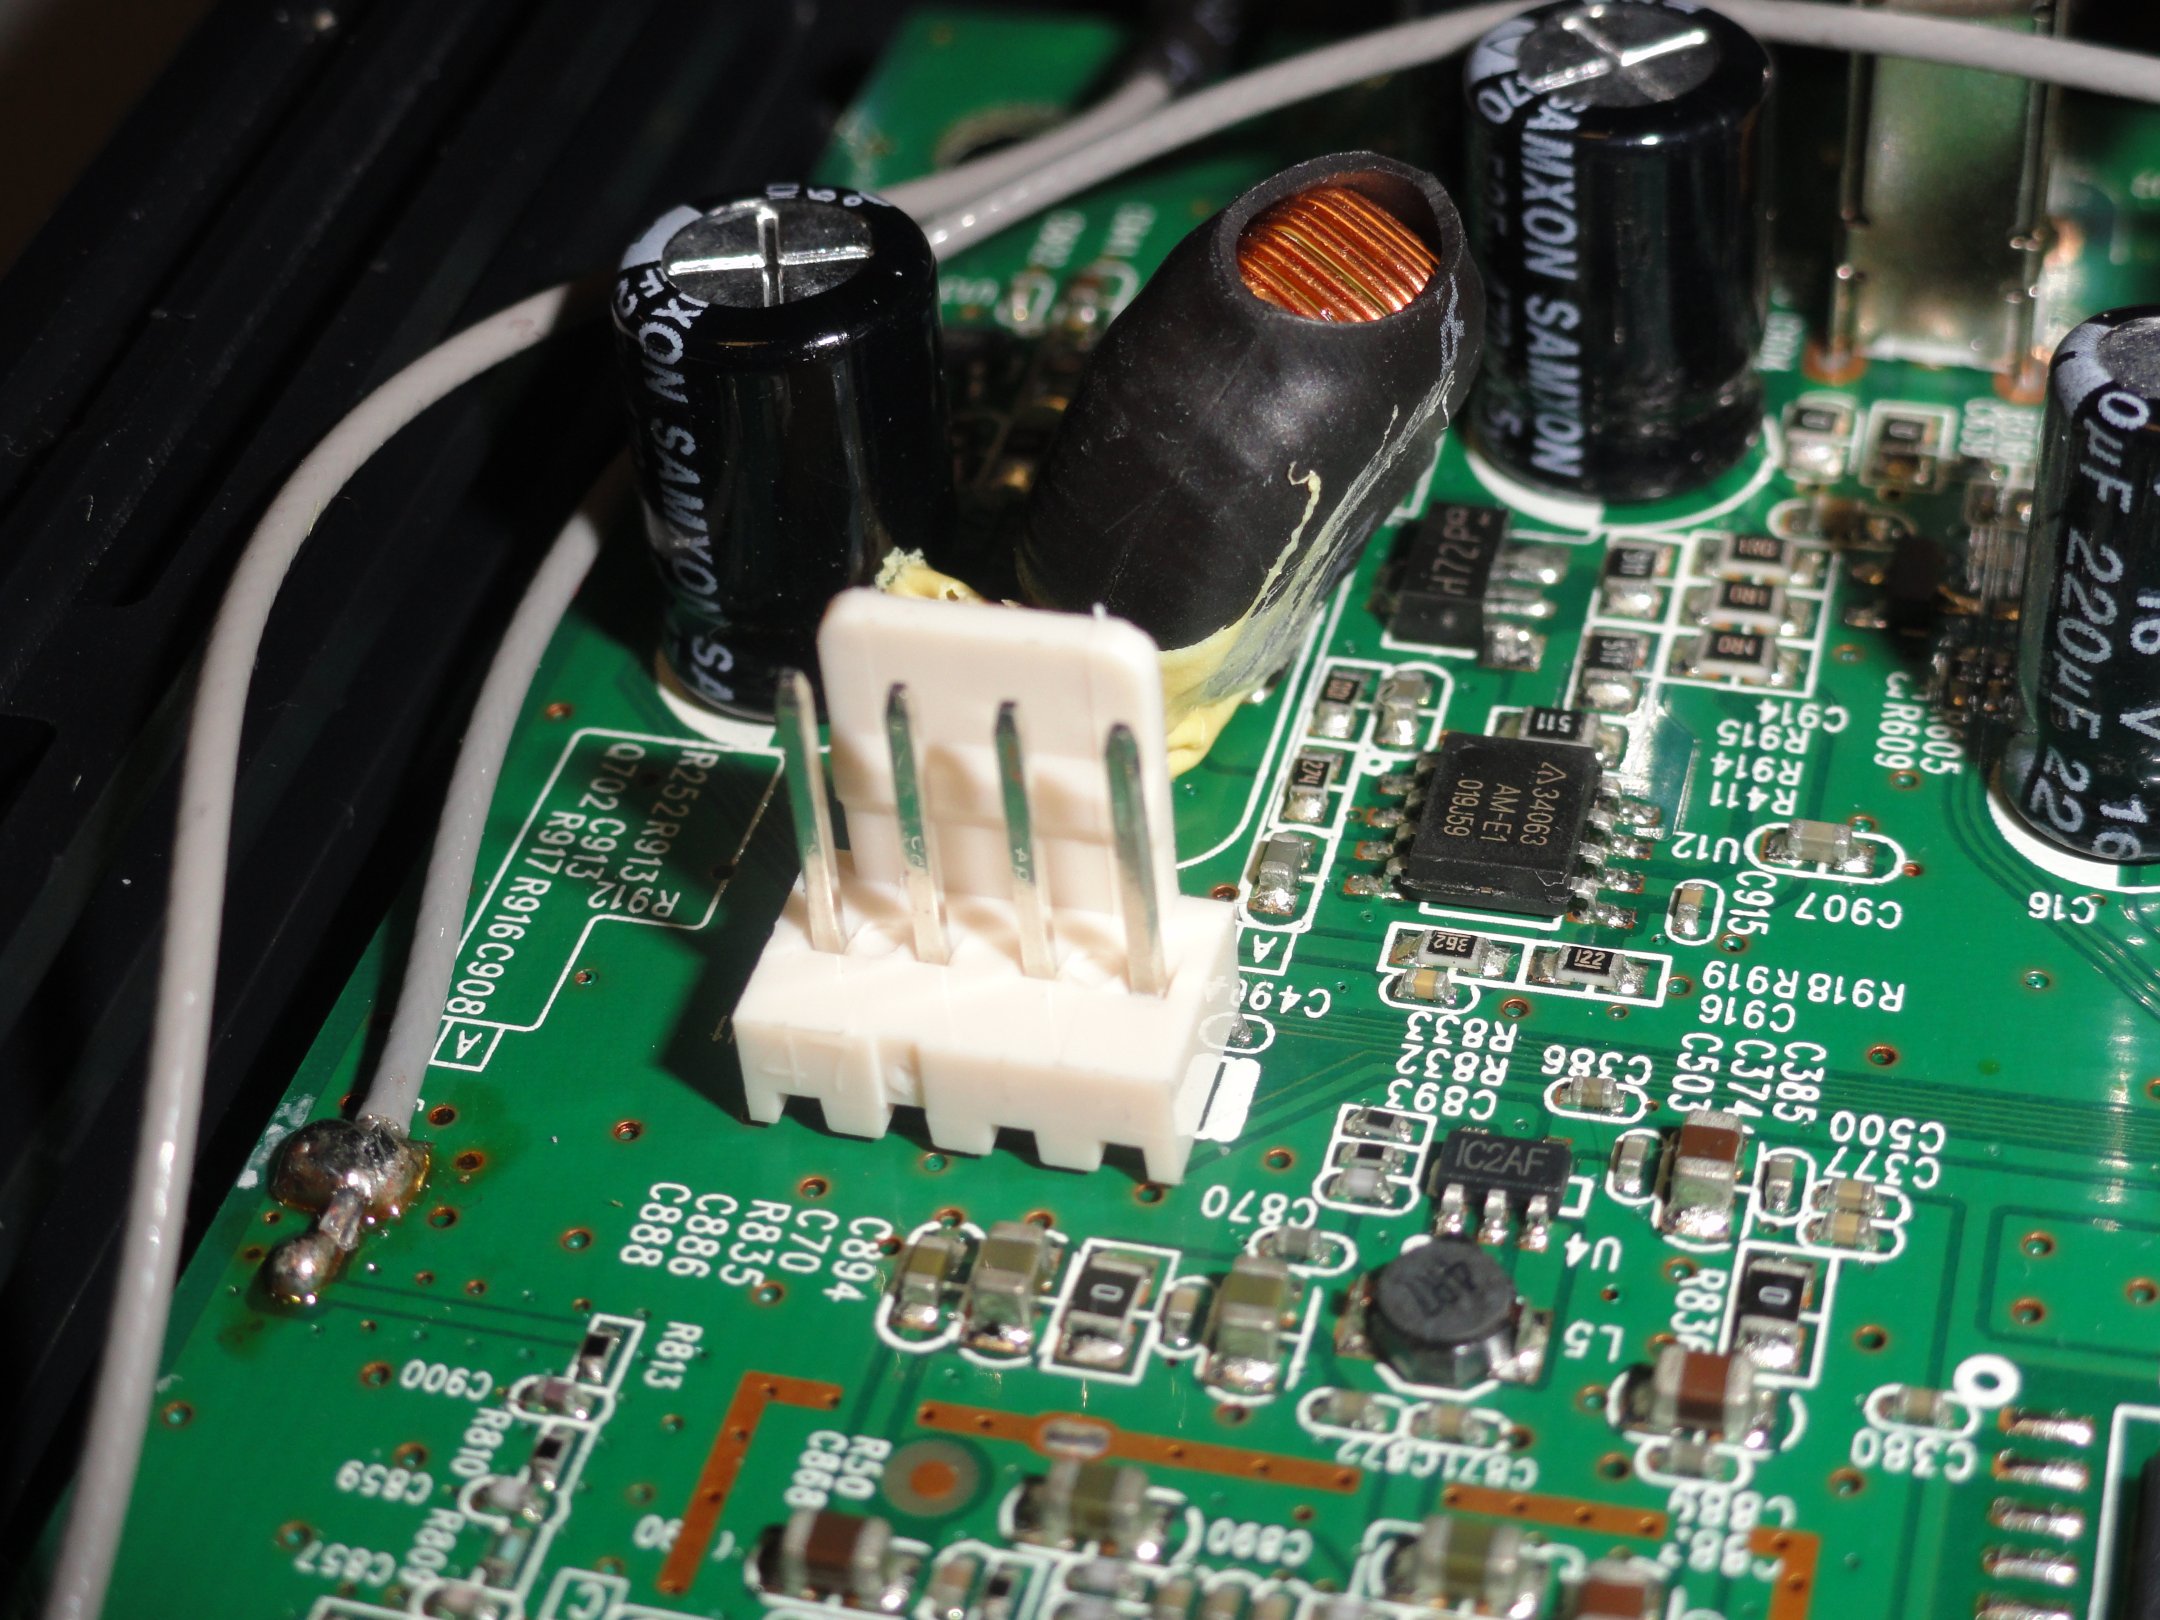
Open carefully the router taking out also the front end with reflectors of the LEDs, in order to be able to remove the router´s PCB. All of following images refer to TL-MR3420 v1 router. Identify where you will connect the cable you just prepared (on the PCB from left to right: Tx, Rx, Ground, Vcc):

The following image shows the pinout exactly as on the router’s PCB:

Remove the solder covering the holes with desoldering pump in order to mount the male Molex connector. You will need to add a bit of extra solder and flux to remove the solder in these holes. For learning to solder, and to remove the solder with desoldering pump there are some nice Youtube videos on the Web showing how to do it.
Connect the male Molex connector (I have used a 4 pin connector to facilitate next connections, you can read about below in this tutorial). So here is an image of the connector already soldered on the router´s PCB:
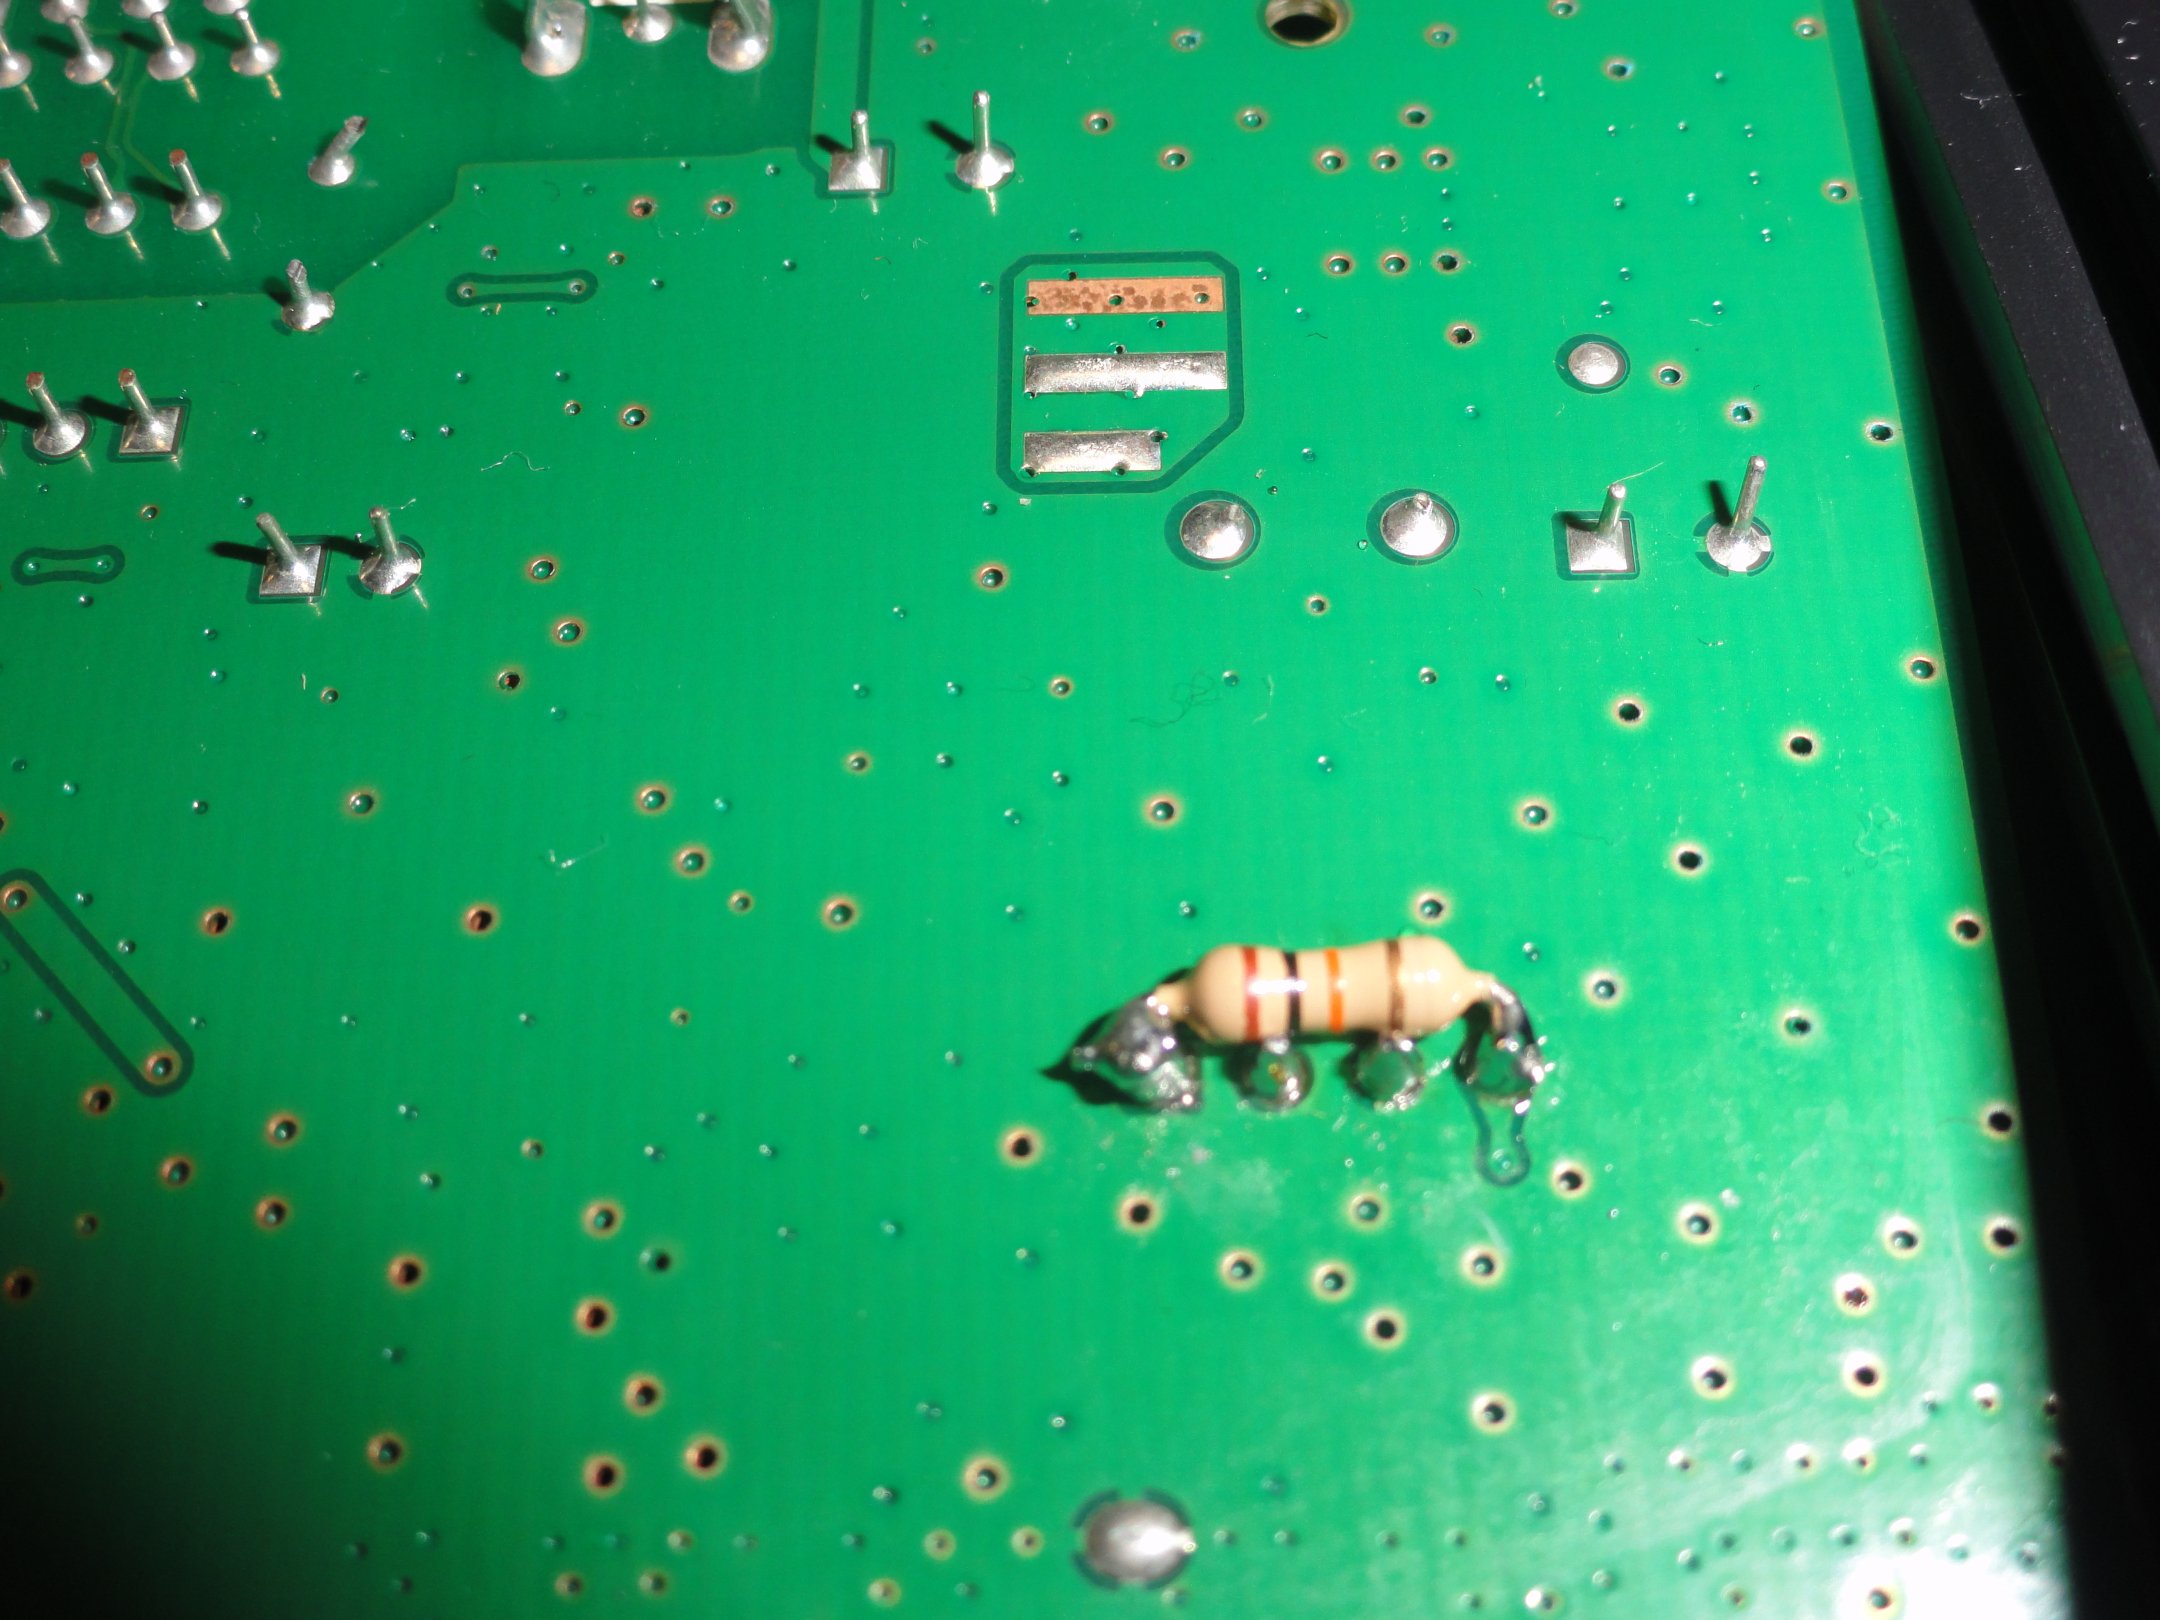
To get the serial connection work reliably, you have to connect a 10k ohms pullup resistor between the Tx and the Vcc on the PCB. This is because the Tx pin is connected to a voltage divider (2×5.6k) and a capacitor is put between the real pin and the Tx connector. So turn over the router´s PCB, and solder a 10K ohms resistor as shown using as support the terminations of the Molex male connector we have soldered before:
Now we are ready to finish up the cable we have crimped before as shown:
Note: A special thank you is due to Filipe Avelar, external salesperson in ALIATRON (my company) that soldered for me the resistor, and crimped the TTL cable terminations.
We are now ready to debrick the router!
Debricking the router
Make sure the router is not powered. Connect the TTL cable to the router as shown:

We will now follow the procedure advised by the polish language site eko.one.pl. It is a good idea to create a folder in your PC to. where you will download some of the files you will require. My folder is called “modem”. My PC’s OS is Windows XP.
Download:
1) firmware openwrt-ar71xx-generic-tl-mr3420-v1-squashfs-factory.bin from Openwrt site to your newly created folder where you will have the whole project.
2) tftp for Windows from http://tftpd32.jounin.net/ to your folder in a subdirectory called tftp.
Paste into tftp subdirectory the firmware you downloaded, and rename it code.bin for sake of easy identification.
Connect the serial TTL cable to your PC (you will have already connected to your router as shown above in this tutorial). The serial TTL cable will be recognised by your PC. If not, you will need to install adequate drivers from Web. My DKU-5 cable came with a CD containing drivers.
If the cable is recognised, check in your PCs Control Pannel -> System -> Hardware -> Device Managemnt -> Ports (COM and LPT) .
You will see thereProlific USB-to-Serial Comm Port (COMx). x will be the port number (in my case it is COM5).
Now start your PC´s Hyper Terminal (or use Putty). For Hyper Terminal give a name to your connection say “test”:

Configure Properties to 115200 8N1.
In Hyper Terminal the configuration is found in File -> Properties -> Configure…-> Connect Using (my case COM5):
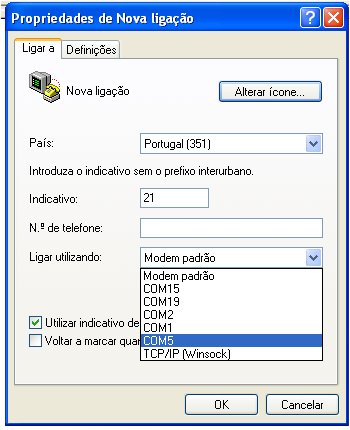
After this selection, press Configure button and now select 115200 baud rate:
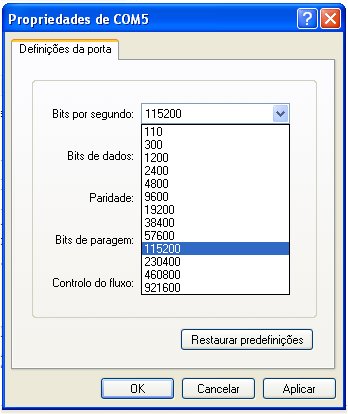
And now press the Apply button and next OK button.
And next on first screen press OK button. Leave the Hyper Terminal as it is, as it is now duly configured (do not close it!).
Change your PCs IP to 192.168.1.27. Connect the CAT5 network cable between your PC and port 1 of your router. Make sure you disable your other network connections in your PC, except for your Local Area Network that you have just connected to the router. Also remove temporarily your PC´s firewall. Your network is now shown without firewall’s lock sign:

We will now start tftp we downloaded before. Tftp will show your PC’s IP you have just configured:

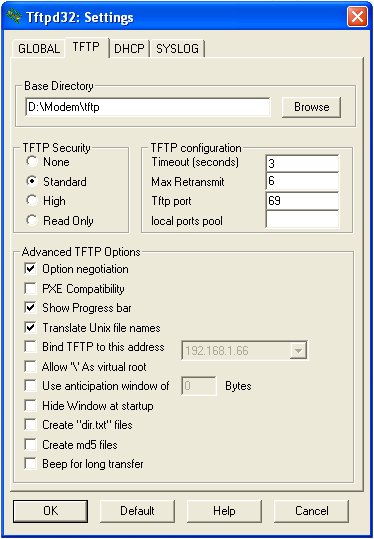
We need to tell tftp where the code.bin firmware is. We do this by pressing Settings button and pointing the Base Directory to the folder containing code.bin:
 Press OK. Now look at your Hyper Terminal´s screen. Power your router.
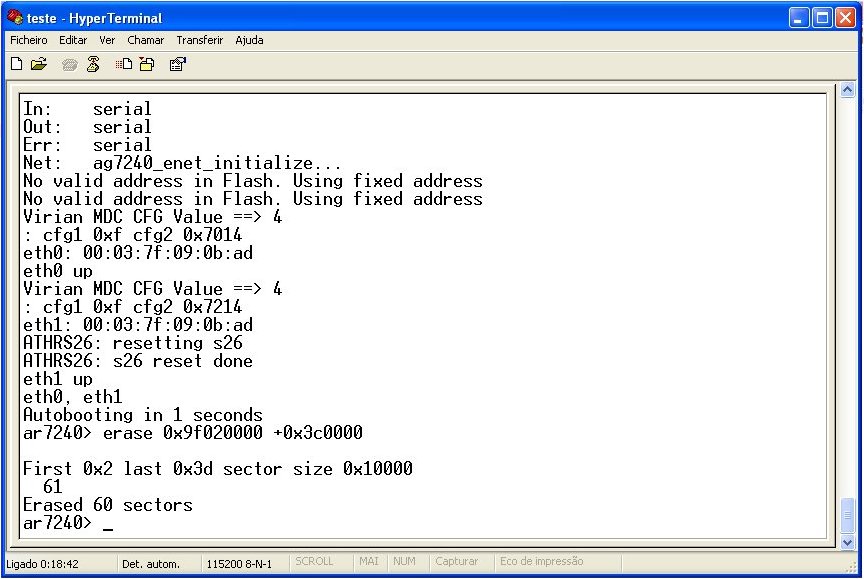
Your Hyper Terminal screen will show “Autoboot in 1…“, when quickly type tpl with your keyboard. You will hopefully see the following prompt, or similar:

We are now ready to type: erase 0x9f020000 +0x3c0000
And press ENTER key. It wll result in erasing an area of the memory of the router:
We will next type the following: tftpboot 0x81000000 code.bin
And press ENTER key. The firmware will be uploaded:

tftp will show the code.bin being uploaded:

We will next type: cp.b 0x81000000 0x9f020000 0x3c0000
And press ENTER key. And at next prompt type: bootm 0x9f020000
The router wil now reboot and it is no more bricked!
You can now check if your router is debricked by writing in your browser the URL http://192.168.1.1. your login screen to the router´s interface will show:

Conclusions
If one has bricked his TL-MR3420 router, the solution lies in debricking with a serial TTL cable. I have shown here that with little bit of soldering, and mechanical (crimping) skills and necessary software one can debrick TL-MR3420 router. The approach of debricking a router may be similar with other brands of routers.

Thank you for your article. You saved my day – Nicolas
Welcome to my blog. I am glad the tutorial has been useful to you.
Hi, I am working on a IP router as a beginner. I am lost in designing it (Schematic). Can you please help if you have any reference design?
Welcome to my blog. I am afraid I can´t help you much and even if I could I would need to know more on the difficulties you have. Coincidence or not I am configuring at the moment my company´s IP phones
Where did you buy this cable in India?
Welcome to my blog. I guess in any cell phone shop. These cables are easy to buy and quite cheap.
for me its not so easy to find it around, its very old cable used around 2007
Welcome to my blog. Actually it is very easy to buy in cell phone shops. It costs very little.
Try Ebay
May be a solution to buy from eBay but mobile phone shops do have these cables (old Nokia cables)
I fixed my router using an Arduino board( using the on board USB-to-TTL converter) because I couldn’t find this cable anywhere. I’ve a detailed blog post on it. Check that out if you like.
https://goo.gl/4E4SMq
PS: I’m also from India 🙂
Excellent. You have a very good website and write quite well. Congratulations!. My parents were born in Porbandar, India but went to East Africa very young.
Hi,
i install openwrt but after installing i don’t understand the software properly so i tried to uninstall it with the help of google through SSh commands -> cd/tmp -> mtd -r write /temp code.bin firmare. this give me the error of “can’t erased memory” after restarting the router’s all lights only blinks continuously once in 1s. do this method works???
You do not install with this method. It seems you have now bricked your router. You will need to follow the tutorial to unbrick it.
But sir i think unbrick will be in same manners just to change the firmware and give it the tp-link firmware instead of openwrt in the command “tftpboot 0×81000000 tl-mr3420.bin” will this commands work too to restore it or unbrick?
Yes Saad. You need to follow the steps.
When I connect to serial console and reboot the caracters are incomprehensible
Well it seems either you have a bad soldering or wrong baud rate. If everything is Ok have you tried to send the commands as suggested and see what happens? May be communication from console is Ok!
Your Hyper Terminal commands were the only ones on the web I could find that worked. It’s been a long day. incomprehensible characters are the result of a poor cable, I had the same problem when using a regular usb to serial cable.
Thanks for saving the day.
By the way my router is a TP-Link TL-WR843ND. I flashed it to OpenWRT to stop Tunein breaking up and it has fixed the problem. I bricked it by trying to flash it to DD-WRT’s firmware for the TL-WR841ND. I wont do it again.
Welcome to my blog. Thank you for your two comments, this and previous one. I am glad my tutorial worked for you.
pls my tl mr3420 tplink wireless router is inaccessible both via the lan cable and over wifi, when i power it on , all the leds come on at once and go off after a second remaining only the power led. Does that mean its bricked? If so can i use a usb to serial (uart) adapter directly?
Thanks pls reply……
Welcome to my blog. What did you do to happen that?
Is CA-53 cable good for this procedure?
You can buy the similar usb device at ebay for less than $2.oo with free shipping.and connect easily.
try this link : http://www.ebay.com/itm/USB-To-RS232-TTL-PL2303HX-Auto-Converter-Module-Converter-Adapter-For-arduino-/180953299346?pt=LH_DefaultDomain_0&hash=item2a21a83992
hey thanks alot for such a great tutorial. with due respect kindly guide me on how to unbrick wa801nd access point.
i first flash openwrt firmware on it. then i try to revert back to factory. but it bricked after the reboot. now all lights blicks after duration of 1 sec. no ethernet port is working. no wifi. and nothing on ip scanner. so the last bet for me is to serial connectivity.
i suppose the above mention tutorial will work with this model too?
and can i flash tp link factory router directly using serial connectivity?
do reply. respect from pakistan.
Yes you can flash to factory firmware.
Hi. I’ve follows all the step. Mine is Mr3420 v1.2.
Trying several openwrt firmware bin files. But only the one you share is give a better result (no more kernel panic)
however, i cannot access the openwrt webinterface. I can ssh, change root password via ssh. But when comes to webinterface, its how nothing. I already clear cache etc, but still got same result.
Do you have any idea? currently, i just TTL back into the original firmware.
Sorry for belated reply. Did you get it working?
if we have arduino dev board, we can use it as USB FTDI device to connect to router easily 🙂 I have been try it using arduino uno.
Thank you for sharing.
I followed your steps. I am trying to debrick and netgear r6250 router.
Hyperterminal Gave me this
Did i solder the serial cord incorrectly or is there something I am missing?
It seems bad connection or problems of configuration. You are getting something.
hii, my tp link mr3420 v.2 just power led , sun & lock led on, i’ve unbricked but when aad tpl command doens’t work, sorry for my eslish..thanks for help
Really I do not understand what is going on. Have you followed my tutorial for unbricking?
So, I followed the step by step procedure as stated in this guide to unlock my router TP-Link WR1043ND and worked great but began to fail after 2 days no LAN and WAN so I went back to repeat the unlock procedure and the worst happened. I sent the message text file hyperterminal I can no longer communicate with the router Help me thanks
Well, on router which lights switch on? You may have a major failure most likely. You may to reset or even debrick.
Well, lights all work well router and flash alternately sending an attachment taken from hyperterminal in windows xp machine language apparently thanks
Well, the lights on the router works well all flash alternately and I want to send an attachment captured hyperterminal in windows xp but not how to send it apparently is machine language thanks
It seems you have bad connection or wrong baud rate?
Hi Sir Tayeb,
Do you have any idea to find other pins for the serial port? I have mistakenly done wrong with it and broke all the pins. So I can’t connect to my serial cable anymore. If possibly to find the trace to those pins, I’d gladly solder to it.
Thanks and regards,
Budiarno
Follow the circuit and find a convenient point to connect. Perhaps you need somebody with knowledge of soldering to help you. If you are not careful you will cause a major fault of your router.
I tried to install openwrt on my mr3420 v1.2, but then it’s bricked. I want to try this step, but the only working connection (before bricked) is wifi. So, I dont think that I can use tftpd32. Is there any way so I can just use serial connection?
Thanks
I am afraid not. Wifi will not do. Only through cable as shown in my tutorial.
My LAN ports, when I connected to my laptop, it shows the SSID, but when I tried to ping from LAN port, it always timed out. Do you think it can be fixed?
Really I don’t understand your question.
Thank you sir! Great description, worked perfect.
Greetz
Hi, Thank you for your article! Can i do this procedure using a USB-Serial RS 232 cable? I’m thinking in put the jumpers cables on the right position of de serial cable and conect these to board of the router.
Sorry for my bad english.
You need serial-TTL and not serial-RS232. You can buy quite a cheap one and cut and use as I have shown.
Hi Tayeb,
Sorry for my mistake. I buy a serial-TTL and work like a charm. My router is the WR841N v.8, so i have to use a little different command’s. This tutorial details the procedures for WR841N*:
http://forum.clubedohardware.com.br/topic/1098832-unbrick-em-roteador-wr841nd-com-usb-ttl-serial/
Thank you again!
Thank you for your feedback. I am glad it worked for you and doubly happy that you are also sharing what you did.
Tried to use a CA-42 cable and I got Serial connection working, but “tpl” command didn´t work. So I pressed reset button and I saw that the router was searching for mr3420v2_tp_recovery.bin file in 192.168.0.66 tftpd. I just put this IP into my PC and changed the name file, and it worked.
The cable was necessary to see it, but I could have debrick it without it knowing that.
Just searched for that in google now and saw that this information was on failsafe mode, at openwrt page.
http://wiki.openwrt.org/toh/tp-link/tl-mr3420
Thank you for information.
Hi,
I cant seem to find the cable you used. Can an Arduino Uno be used in the same way as the cable ? Or an USB-TTL 3.3V circuit ?
About the OpenWRT firmware you used, is the USB port on the router working ?
Thank you!
No Santos you need a cable with USB to RS232 TTL conversion. You can find these in Mobile phones shop. Firmware can only be uploaded after you connect to the router as shown in picture.
I’ve tried this morning, the CA-56 cable, but it does not recognise the cable. I’ll be looking for the DKU-5 or CA-42 this afternoon.
And about the USB port of the router, does it work with the Open-WRT Firmware ?
It may work with Open-WRT, just double check the size of firmware if it fits otherwise you may brick your router. Where do you live?
You are my hero.. Lol.. Thank you so much for the Info.. Saved my day.
I am glad it worked for you. Thank you for your kind words.
I didnt find the DKU5 cable but got a USB-TTL calbe 3.3v instead. Is it the “same” ?
DKU-5 provides 3,3V, so as long as your cable has some number of wires, and you can identify them correctly, I believe it should work. DKU-5 can be found in cellphone shops.
Ok thanks! Gonna try it latter!
The cable is a USB-TTL 3.3v, all the wires are identified, so I guess it wont be that hard, anyways, but I’ll try it and leave the feedback later on.
The DKU-5 Cable, I tryed to find it on-line and pretty much in every cellphone store arround here, but no luck! They all say it’s to old, it’s not in use anymore and so on…
Anyways, thanks!
Hi, should work this cable articulo.mercadolibre.com.ar/MLA-601026635-adaptador-usb-ttl-serie-cable-arduino-pl2303-5v-33v-ptec-_JM
and should i connect 4 pins or only 3 that you have connected?
thank you
You just need only 3 pins, Tx, Rx, and GND
Thanx Tayeb! I managed to debrick my old MR3420 v1.3. I did use CP2102, USB to TTL serial converter. I did not have 10k resistor, I just took some range 6k. My MR3420 did not boot, via serial connection I was able to see that booting process stops totally after some memory check.
(I did not get any access to console) and anyhow I noticed that MR3420 was stopping even “earlier” when powered on some time.. warming. I got idea if somehow temperature related issue. I just sprayed coldspray onto system… few boot trials.. System booted! And got access into console and just installed firmware according these instructions and system works fine. Finally installed ROOTer GoldenOrb and now it has been online 2 weeks without any issues. 🙂 Br, bluezmobile
Very good indeed and thank you for letting know. I am glad my tutorial was useful. Do like me always share just for sharing.
I followed your tutorial, but i cannot type tpl in putty, rather some unknown characters appear, what is the problem now? help me out in debricking it, what should be the voltage level at the tx of the router, in order to make it working , Kindly reply, i already wasted a few days
Thanks Tayeb. I’ve just unbricked my old MR3420 v1.2. I had some issues with sending tpl command, but it turned out to be my USB to UART adapter issue. I’ve found in OpenWRT forum that there needs to be 3.3V between my Rx and GND pins (common issue with some low cost adapters). So I decided to use my NodeMCU (an arduino compatible board) and it worked like a charm. So if anyone else has similar issues, please ensure that your cable/adapter works correctly and that you are sending tpl command right after router says “Autoboot in 1 sec” (otherwise, it will ignore it). Hope it will help.
Thank you so much for sharing this detailed guide on debricking my TL
Your post is incredibly helpful, and I really appreciate the effort you put into explaining each step clearly.
Best regards,
Alessio
Thanks Alessio for your feedback
This is very helpful information for anyone who wants to debrick their router.