
Introduction
Chrome Packaged Apps are evolving to do more, work seamlessly offline, and give developers more control of their user interface. New APIs allow applications to access OS-level features: networking, bluetooth, and even serial IO.
Renaun Erickson has shown how to use the Chrome Serial API with Arduino. One can use the chrome.serial API (stable since Chrome 23) to read from and write to a device connected to a serial port.
Objectives
Communicate through Chrome serial and html and Javascriot, to read from and write to external hardware, a chipKIT Digilent UNO32 board with Basic I/O shield.
Requirements

– chipKIT Digilent UNO32 development board
– MPIDE software
– Digilent BASIC I/O shield
– Google Chrome browser
MPIDE software for programming chipKIT Digilent UNO32 baord must be installed in your PC. Check previous tutorial on this blog LabVIEW Interface for chipKIT Digilent UNO32 Development Board.
Procedure
a) Install libraries of Basic I/O Shield in MPIDE environment for UNO32 board
On Uno32 you must have Jumpers JP6 and JP8 set in the RG3 and RG2 positions. Install the Basic I/O shield on top of UNO32 as shown on the above image . Connect to the PC with USB cable. USB connection will power UNO32 and the Basic I/O shield simultaneously.
We assume that you have already installed MPIDE environment.
You will need to know the location of MPIDE sketches folder:
Run MPIDE ![]() (in my PC with Windows XP Pro I need to do it with Administrator’s priviledges). In menu do File -> Preferences find the sketchbook location:
(in my PC with Windows XP Pro I need to do it with Administrator’s priviledges). In menu do File -> Preferences find the sketchbook location:

Take note of the location of your sketches (MPIDE codes are called “sketches”). In your Windows navigate to where the folder is, and create a directory named ‘Libraries’.

Download from here the zipped file containing libraries and documentation for using the Basic I/O Shield™ with the chipKIT MPIDE and unzip into the Libraries folder you have just created:
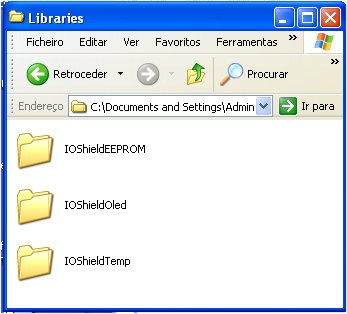
Now if you do File -> Examples you will see three folders IOShieldEEPROM, IOShieldOled and IOShieldTemp. Open the sketch IOShieldTemp_Demo:

Next choose the board (in our case UNO32):

And Serial Port to which the board is connected:

To be sure of what you are doing, I advise that you read my previous tutorial here in this blog LabVIEW Interface for chipKIT Digilent UNO32 Development Board.
Now we are ready to upload the sketch to the board. Click the Upload button ![]() on MPIDE environment.
on MPIDE environment.
If successful you will see the following results at bottom of MPIDE environment:

We are now ready to check what is being sent to our COM21 port (your PC’s may be other) in Tools -> Serial Monitor:

A new window will pop up showing the readings sent to our PC’s serial port:

We are getting readings in ºC and ºF. If you are here the rest will go smoothly.
We will later change this sketch and adapt it to chrome.serial.
b) Download Google App and chipKIT Sketch
In order not to prolong a lot this tutorial, I have made available for download from free repository for private use Bitbucketv all that is required for next stage . So download the zipped file from this link.
Unzip the file into a conveniente directory may be named chipkit that you may create in your C:\ or D:\ or other drive.
c) Install sketch in UNO32
Open the sketch you have just downloaded in your MPIDE environment doing File -> Open and navigating where the directory chrome-serial-chipkit-uno32 is.
Check the sub-directory IOShield_Chrome_Temp and open IOShield_Chrome_Temp.pde.

Upload this sketch to UNO32 clicking on Upload button ![]() .
.
If uploaded correctly you will be greeting with following message at bottom of your MPIDE environment:
 Close MPIDE environment in order to release the port of your PC.
d) Install Google App
We will install the app as extension in Google Chrome.
First enable the experimental API in your browser.
Go to Chrome://flags, find “Experimental Extension APIs”, click its “Enable” link, and restart Chrome. From now on, unless you return to that page and disable experimental APIs, you’ll be able to run extensions and apps that use experimental APIs.
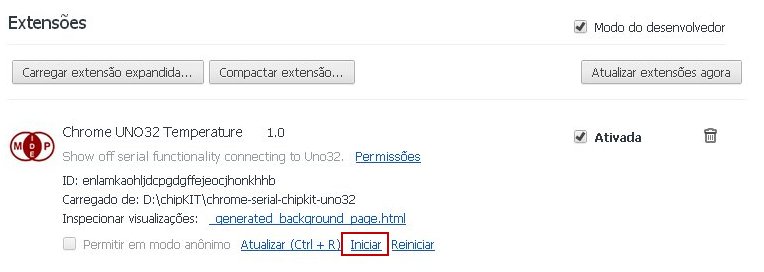
Our App is an experimental app. Go to chrome://extensions then click “Load unpacked extension…”.

Then navisgate where the folder you donwloaded is and choose the folder:

Click OK. Next on Launch “Chrome UNO32 Temperature” to get it working (in Portuguese it is “Iniciar”):
You will be greated with the Crome App:

Choose the correct port. In our case it is Port21.

Immediately you will be greeted (provided port of your PC is released) with blinking simulated LED and reading of temperature from chipKIT Digilent UNO32:
 You can play with the App moving the slider and seeing the reduction of frequency of blinking LED (simulated on App and in real life on Basic I/O shield on UNO32.
If you restart your Chrome browser you will be greeted with the App which you can start directly clicking on to it:

A demo video I have uploaded to Youtube shows this Chrome App working:
Conclusions
Chrome can talk to external hardware and thus offers enormous potentiality towards future apps. The combination of Chrome (with serial API since Chrome 23), Javascript and easy to program UNO32 development board can be awesome. We can next add graphic presentation of temperature (with many Javascript gauges that are already available), add database, voice commands and responses, and why not Cloud logging and display with many services like Exosite.

ciao
I’m trying to develop a little application (synching a light with a video) http://www.dataino.it/videosinc/video.php with arduino now work using ethernet shield
using your example i need to made a serial control but in your example there is an error
port.match(/COM[12345678]/)
change in
port.match(/COM[123456789]/)
com9 i’s not displayed
Welcome to my blog. Sorry for late reply. I was abroad without any Internet access. You are doing it wrong you keep the COM code as it is and it ought to find all available COM ports in your PC.