
Introduction
NI LabVIEW and chipKIT Digilent UNO32 are powerful tools that offer enormous potentialities. Remote monitoring and webserver capabilites of LabVIEW further enhance our projects.
It has been shown here in this blog that NI LabVIEW can be easily connected to chipKIT Digilent UNO32 board with two step-by-step tutorials
LabVIEW and VISA interface, with chipKIT Digilent UNO32 and Basic I/O Shield and
LabVIEW Interface for chipKIT Digilent UNO32 Development Board.
A further enhancement with bluetooth monitoring and Webserver for remote viewing is an interesting proposition that will dwell upon here.
Pre-Requirements
It is advisable and necessary to carry out both of tutorials on LabVIEW and UNO32 found here in this blog:
LabVIEW and VISA interface, with chipKIT Digilent UNO32 and Basic I/O Shield and
LabVIEW Interface for chipKIT Digilent UNO32 Development Board.
Requirements


– chipKIT Digilent UNO32 development board
– Power supply for UNO32
– MPIDE software
– Digilent BASIC I/O shield
– LabVIEW software and VISA drivers
– Class I or II Bluetooth adapter
– JY-MCU Bluetooth Module (available from ebay)
Precedures
1 – Preparing our setup
Connect JY-MCU as shown:
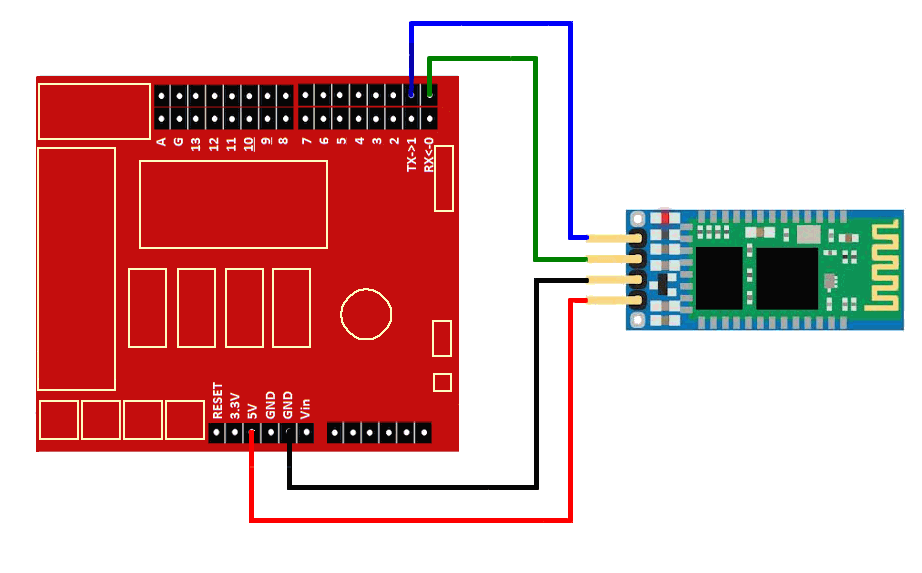
UNO32 must be connected to an adequate external power supply (my highly stable power supply is set 7,5V dc). Once UNO32 is powered will see a blue LED blinking on your JY-MCU module.
Basic I/O shield must be installed on top of UNO32. Check the tutorial here in this blog LabVIEW and VISA interface, with chipKIT Digilent UNO32 and Basic I/O Shield for setting up the LabVIEW, VISA and installing firmware in UNO32 with MPIDE environment.
2 – Bluetooth installation in your PC
You must have your bluetooth adapter duly installed in your PC. My Sweex adapter shows in my PC’s sytem tray, a bluetooth symbol. After activating bluetooth I have the option to find the local bluetooth connections:

Do a search, and eventually you will find linvor (default name of JY-MCU module, a name that can be changed if required):

Next we will connect to JY-MCU bluetooth module (found in my PC in COM4):

You will need to introduce the password which is ‘1234’:

I have blurred the MAC address of my bluetooth module. After introducing the password click the OK button. You will see linvor connection changing to green.

3) Running our VI
We are ready to run our IOShield_LV_Temp.vi. You can download it from free repository Bitbucket, by clicking on the link IOShield_LV_Temp.zip. The zip file you will download contains the VI we wrote in previous tutorials.
Set the port to your bluetooth module’s (in my set up it is COM4).
Run the VI clicking on button ![]()
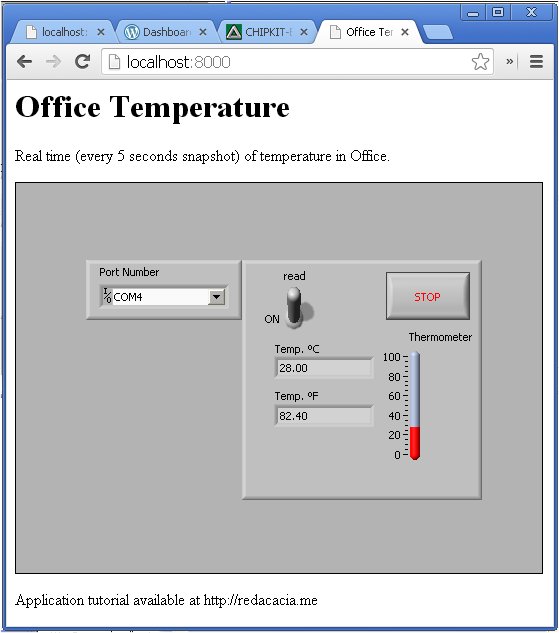
If everything is right, you will see temperature being displayed on your VI’s Front Panel read by UNO32 from the temperature sensor on Basic I/O shield:

You can view the VI being run, with Ctrl + E in your keyboard.
In Block Diagram click on Highligh Execution button ![]() . It will show you the VI being run in slow motion, and any errors that may occur for debugging purposes.
. It will show you the VI being run in slow motion, and any errors that may occur for debugging purposes.
4) Web publishing VI
In LabVIEW Front Panel do Tools -> Web Publishing Tool:

Next in Web Publsihing Tool select the VI:

Select Monitor and change the number fo snapshots to every 5 seconds:
 Clich Next button
Now personalize your Webpage as shown (with your description)

Click Next button.

Here leave the default location as it is, but change the file name to index (by default it will be IOShield_LV_temp).
Click Save to Disk button.

Press OK button on Document URL pop up window. Web Publishing Tool will close.
You can now access the webpage in your favourite browser, writing the URL http://localhost:8000 :
If for any reason, the webserver does not start automatically, do Tools -> Web Publishing Tool, and then click Start Web Server button.
You can watch a demo video on Youtube:
Conclusions
We have achieved remote temperature viewing of temperature read by our chipKT Digilent UNO32 from the temperature sensor on Basic I/O shield. LabVIEW is now publishing a Webpage of the fornt Panel of VI that can be accessed from outside by doing Port forward in one’s router.
We have shown again the potentialities of LabVIEW and chipKIT UNO32 development board.
For further reading I suggest you visit NI’s website.
I shall appreciate any comments and suggestions. I will also appreciate if you point out any errors or omissions.

Thanks a lot for tutorials for Digilent boards . In my school laboratory , we begin to use Labview (10/09/2013) with LEGO NXT, Digilent Max32 and UNO32 with Basic I/O Shield , Arduino , Robot Tetrix , USB-6009 , module RIO (FPGA),many I2C sensors,…
Welcome to my blog. Well, your school is investing in future generation of engineers and scientists. You are using very powerful tools. Technology is being desmystified at your school! Very good indeed!
aslam_O_aliakum
hi Sir,
please give me a labview project using DAQ .
thanks
Wa-alaikum-as-salam. Welcome to my blog. Check here in this blog Home Alarm project. You can change it and do something else.
Thank you for the great tutorial project. I work for Digilent Inc and we shared this project on our social media.
Hello,
Your blog are found some information for labview