
Introduction
In computing, a visual programming language (VPL) is any programming language that lets users create programs by manipulating program elements graphically rather than by specifying them textually. A VPL allows programming with visual expressions, spatial arrangements of text and graphic symbols, used either as elements of syntax or secondary notation. For example, many VPLs (known as dataflow or diagrammatic programming)[1] are based on the idea of “boxes and arrows”, where boxes or other screen objects are treated as entities, connected by arrows, lines or arcs which represent relations [2]
Programming chipKIT, or for that matter Arduino, may be complicated for beginners. Visual Programming environments, such as of ArduBlock, can be a simple and easy solution for such beginners. ArduBlock is a programming environment designed to make “physical computing with Arduino /chipKIT as easy as drag-and-drop.” Instead of writing code, worrying about syntax, and (mis)placing semicolons, ArduBlock allows you to visually program with an snapped-together list of code blocks.
ArduBlock builds on the simplicity of Arduino /chipKIT, and creates a perfect beginner gateway to physical computing. Instead of tearing your hair out debugging, you can spend your time creating! (2)
Required Materials
- chipKIT Digilent uC32 (or Uno32)
- Digilent Basic I/O shield
- Breadboard
- Light sensor LDR
- 10Kohms resistor
- Buzzer

Installing ArduBlock
ArduBlock will work as an add-on, or more precisely a a tool, in chipKIT programming environment. It requires that you have either MPIDE or UECIDE installed. The benefit of that, though, is – because MPIDE or UECIDE are multi-platform (Windows, Mac, or Linux) ArduBlock works in all of these platforms .
How to install in MPIDE and in UECIDE programming environments? See below:
a) In MPIDE
ArduBlock comes with no installer, just a Java file that needs to be stored in a very specific location in MPIDE.
- Download and Install MPIDE (if you haven’t already) – Ardublock is a tool that can be installed in MPIDE, so first of all you to have MPIDE installed on your computer.
- Download ArduBlock – Click the link to the left, or head over to the ArduBlock Sourceforge page to find the latest and most recent version.
- Identify your MPIDE Sketchbook location – This is a folder on your computer where your sketches and libraries are saved by default. To find your sketchbook location, run MPIDE, and go to File > Preferences.

- And open Preferences

The contents of the top text box defines your sketchbook location. Memorize that location and close MPIDE.
- Create in sketchbook folder the folders tools/ArduBlockTool/tool/
Note: each folder is case sensitive.
The Ardublock file you downloaded earlier needs to locted inside tool folder within MPIDE sketchbook.

- Start MPIDE – Or restart it if it was open.
- Select the Board and Serial Port: make your board (our caseuC32) and serial port selections (that you can know from Panel Control) from the “Tools” menu.
- Open ArduBlock – Run ArduBlock by clicking Tools > ArduBlock. If you don’t see an entry for ArduBlock here, double-check to make sure your directories are all correctly typed and cased.

ArduBlock works together with MPIDE editor – it relies on the IDE being open in the background, so MPIDE window must remain open!
b) In UECIDE
- Download and Install UECIDE (if you haven’t already) – Ardublock is a tool that can be installed in UECIDE, so first of all you to have UECIDE installed on your computer. Check out the tour of UECIDE.
- You will be asked to add plugins right at beginning. Choose chipKIT and the board your are using (in this case it is uC32)
- Insstalling ArduBlock tool is straight forward in UECIDE! Open Tools -> Plugin Manager. A popup windows will open. Choose Plugins:
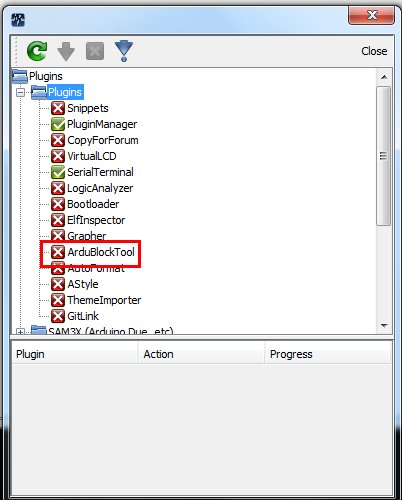
- Immediately the download arrow on top menu of this windows will be selected:

- Click on the downard arrow and the ArduBlock tool plugin will be downloaded and installed automatically.
- Now restart UECIDE and you will see ArduBlock has been installed as a tool. You need to tell UECIDE the port at which your chipKIT board is under Hardware.
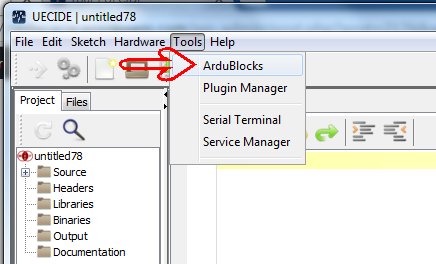
So tha is it! Just as with MPIDE, ArduBlock works together with UECIDE editor – it relies on the IDE being open in the background, so UECIDE window must remain open!
Usage of ArduBlock
Start ArduBlock either in MPIDE or UECIDE whichever IDE you installed.
The ArduBlock window is split into two halves. The leftside of main interface contains the modules that contain blocks used for programming.
Every ArduBlock program requires a Program block, which you can find in the Control module. The Program block defines the setup and loop functions that every Arduino /chipKIT program requires.

From dragging and dropping Program block, you can drag and drop more Blocks over, snapping them into either the setup or loop sections of Program block.
First Project: Blinking Led
Before you start uC32 board must be connected to your PC snd Basic I/O board installed on top of it.
Drag, drop and snap the required blocks to obtain the result shown below:

Now if you upload clicking Upload to Arduino you will see on MPIDE editor the sketch and this will be automatically uploaded to chipKIT uC32. After uC32 board resetting you will see Led 26 on Basic I/O shield blinking.
All exercises contained in “Getting Started with chipKIT” book by Chuck Hellebuick have been carried out based on uC32, Basic I/O shield and the components mentioned above. Pins have been adapted to work with Basic I/O shield.
Chap 2: As shown above
Chap 3: As shown below:

Chap 4: As shown below:

All of chapters have been tried and tested and commented. Only chapter 11 Serial Communication has not been tried and tested, but it should be also to set up.
Download all the duly commented ArduBlock sketches (chap 2 to 10) kept at Bitbucket, an unlimited free private repositories’ site.
Video
Watch a video published on YouTube showing chipKIT uc32 playing various tones through a buzzer:
Conclusion
Before writing this tutorial I tried Scratch for Arduino (S4A), and other Visual Programming editors. None do seem so much functional as ArduBlock, specially because they all worked only as an interface connecting serially, or by network to Arduino / ChipKIT.
ArduBlock, and now BlocklyDuino, a new and promising Web-based visual programming editor for Arduino /chipKIT, are ideal for beginners that, after learning to program with graphical elements, can easily progress to more complex Arduino C-like programming language.

Pingback: Visual Programming for chipKIT » chipKIT Development Platform