
Introduction
The Digilent chipKIT uC32 board is based on the popular Arduino™ open-source hardware prototyping platform and adds the performance of the Microchip PIC32 microcontroller. This board is the same form factor as the Arduino™ Uno board and is compatible with many Arduino™ shields. It features a USB serial port interface for connection to the IDE and can be powered via USB or an external power supply. The uC32 board takes advantage of the powerful PIC32MX340F512 microcontroller. This microcontroller features a 32-bit MIPS processor core running at 80MHz, 512K of Flash program memory and 32K of SRAM data memory.
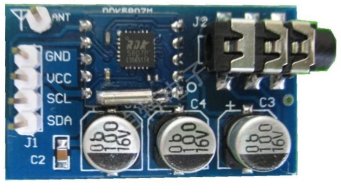
The RDA5807M – an equivalent of Philips TEA5767 and pin-to-pin compatible – is a single-chip broadcast FM stereo radio tuner with fully integrated synthesizer, IF selectivity and MPX decoder. The tuner uses the CMOS process, support multi-interface and require the least external component. It is completely adjustment-free. The RDA5807M has a powerful low-IF digital audio processor, this make it have optimum sound quality with varying reception conditions. The RDA5807M can be tuned to the worldwide frequency band.
The Digilent chipKIT uC32 and Basic I/O shield communicating in I²C protocol with the RDA5807M module can be quite a powerful, yet simple, FM Radio tuner. I²C uses only two bidirectional open-drain lines, Serial Data Line (SDA) and Serial Clock Line (SCL), pulled up with resistors. Typical voltages used are +5 V or +3.3 V although systems with other voltages are permitted.
Requirements
- Digilent chipKIT uC32 Development board with Digilent Basic I/O shield on top, and power supply

- MPIDE software
Procedures
a) Install libraries of Basic I/O Shield in MPIDE environment for uC32 board
We assume that you have already installed MPIDE environment.
You will need to know the location of MPIDE sketches folder:
Run MPIDE ![]() . In menu do File -> Preferences find the sketchbook location:
. In menu do File -> Preferences find the sketchbook location:
 Take note of the location of your sketches (MPIDE codes are called “sketches”). In your Windows navigate to where the folder is, and create a directory named ‘Libraries’.
Download from here the zipped file containing libraries and documentation for using the Basic I/O Shield™ with the chipKIT MPIDE and unzip into the Libraries folder you have just created:
 So here we are to go to next procedure
b) Hardware set up
In the first place prepare Digilent chipKIT uC32 board for I²C communication in pins A5 and A6.
On uC32 you must have Jumpers JP6 and JP8 set in the RG3 and RG2 positions.
 Install the Basic I/O shield on top of Uc32 as shown on the above image . Connect to the PC with USB cable. USB connection will power the Uc32 and the Basic I/O shield simultaneously. Connect the FM module to uC32 and Basic I/O shield.
The following circuit diagram shows the connections to FM Radio Module:
 c) Firmware installation
We assume that you have already installed MPIDE environment.
You will need to know the location of MPIDE sketches folder:
Run MPIDE![]()
We will use RDA5807M in Philips TEA5767 mode.
Now do File -> New and write a new Sketch:
/* Code based on Dr Monk's TEA5767 FM Radio Breakout Board for Arduino at: http://www.doctormonk.com/2012/03/tea5767-fm-radio-breakout-board-for.html For a similar but more advanced project have a look at:Arduino FM receiver with TEA5767Adapted for Digilent chipKIT uc32 and Basic I/O shield by Tayeb Habib tayeb.habb@gmail.com http://redacacia.me */ #include <Wire.h> #include <IOShieldOled.h> unsigned char frequencyH = 0; unsigned char frequencyL = 0; unsigned int frequencyB; double frequency = 0; int tensf = 0; int onesf = 0; int dot_tensf = 0; int dot_onesf = 0; int freq=0; void setup() { Wire.begin(); frequency = 89.5; //starting frequency setFrequency(); Serial.begin(9600); IOShieldOled.begin(); IOShieldOled.displayOn(); } void loop() { int reading = analogRead(0); frequency = ((double)reading *(108.0 - 87.5))/1024.0 + 87.5; frequency = ((int)(frequency * 10))/10.0; setFrequency(); // to view frequency with Tools >> Serial Monitor // Serial.println(frequency); freq = frequency*100; dot_onesf = freq%10; freq = freq/10; dot_tensf = freq%10; freq = freq/10; onesf = freq%10; freq = freq/10; tensf = freq%10; freq = freq/10; //convert the digits data to ASCII tensf = tensf+48; onesf = onesf+48; dot_tensf = dot_tensf+48; dot_onesf = dot_onesf+48; // OLED display start up IOShieldOled.displayOn(); {// Display information on OLED display IOShieldOled.setCursor(0, 0); IOShieldOled.putString("FM Radio"); IOShieldOled.setCursor(0, 2); if (tensf <= 48) //ASCII equivalent of zero { IOShieldOled.putString("1"); } else { IOShieldOled.putString(" "); } IOShieldOled.setCursor(1, 2); IOShieldOled.putChar(tensf); IOShieldOled.setCursor(2, 2); IOShieldOled.putChar(onesf); IOShieldOled.setCursor(3, 2); IOShieldOled.putString("."); IOShieldOled.setCursor(4, 2); IOShieldOled.putChar(dot_tensf); IOShieldOled.setCursor(5, 2); IOShieldOled.putChar(dot_onesf); IOShieldOled.setCursor(7, 2); IOShieldOled.putString("MHz"); } void setFrequency() { frequencyB = 4* (frequency*1000000 + 225000)/32768; frequencyH = frequencyB >> 8; frequencyL = frequencyB & 0XFF; delay(100); Wire.beginTransmission(0x60); Wire.write(frequencyH); Wire.write(frequencyL); Wire.write(0xB0); Wire.write(0x10); Wire.write((byte)0x00); Wire.endTransmission(); delay(100); }
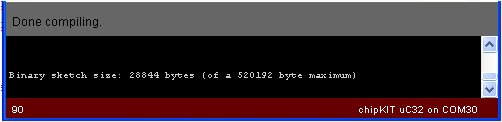
Now first run the code with Verify ![]() to check if it compiles with errors. If does not compile, check the code and compare with the one above. A successful compilation MPIDE will show a message similar to the following:
to check if it compiles with errors. If does not compile, check the code and compare with the one above. A successful compilation MPIDE will show a message similar to the following:
 Now we are ready to upload the firmware.
Check that your COM port. In my case it is COM30.
Now click on Upload button ![]() . With a successful upload MPIDE will show a message similar to the following:
. With a successful upload MPIDE will show a message similar to the following:
 If all is well you can now tune FM Radio stations. The pot on Basic I/O is to be used to tune in the radio stations.
Demonstration Video
I have uploaded a video on Youtube that you can view to see the FM Radio tuner in action:
Next Step
You can add more features like a LED switching on when a station is tuned in. If the station is STEREO or MONO broadcast show it on OLED dspaly, and many other options that RDA5807M module allows. RDA5807M is superior to Philips TEA5767, and has many other possibilities and features.
Conclusions
The Digilent chipKIT uC32 and Basic I/O shield communicating in I²C protocol with the RDA5807M module can be quite a powerful, yet simple, FM Radio tuner.
What we have done effectively is a proof-of-concept, i.e. that Digilent chipKIT uC32 can be an adequate replacement to Arduino Uno board to work as a tuner of FM Radio.

Pingback: Control Remotely a FM Radio module using RDA5807M with a Digilent chipKIT uC32 and Basic I/O | RedAcacia
Pingback: FM Radio Over I2C with chipKIT uC32 and Basic I/O Shield » chipKIT Development Platform